On this tab we can create web sites, subdomains, aliasdomains, FTP accounts, shell users, MySQL databases, and cron jobs, and take a look at traffic statistics.
Contents
2.1 Websites
2.1.1 Website
This is where we can create new and edit/delete existing web sites.
To create a new web site, click the Add new website button. This will lead you to the Web Domain form with the tabs Domain, Redirect, SSL, Statistics, and Options.
Some fields are relevant to Apache only, others to nginx and are only shown if the appropriate http server is installed.
Webdomain
Domain
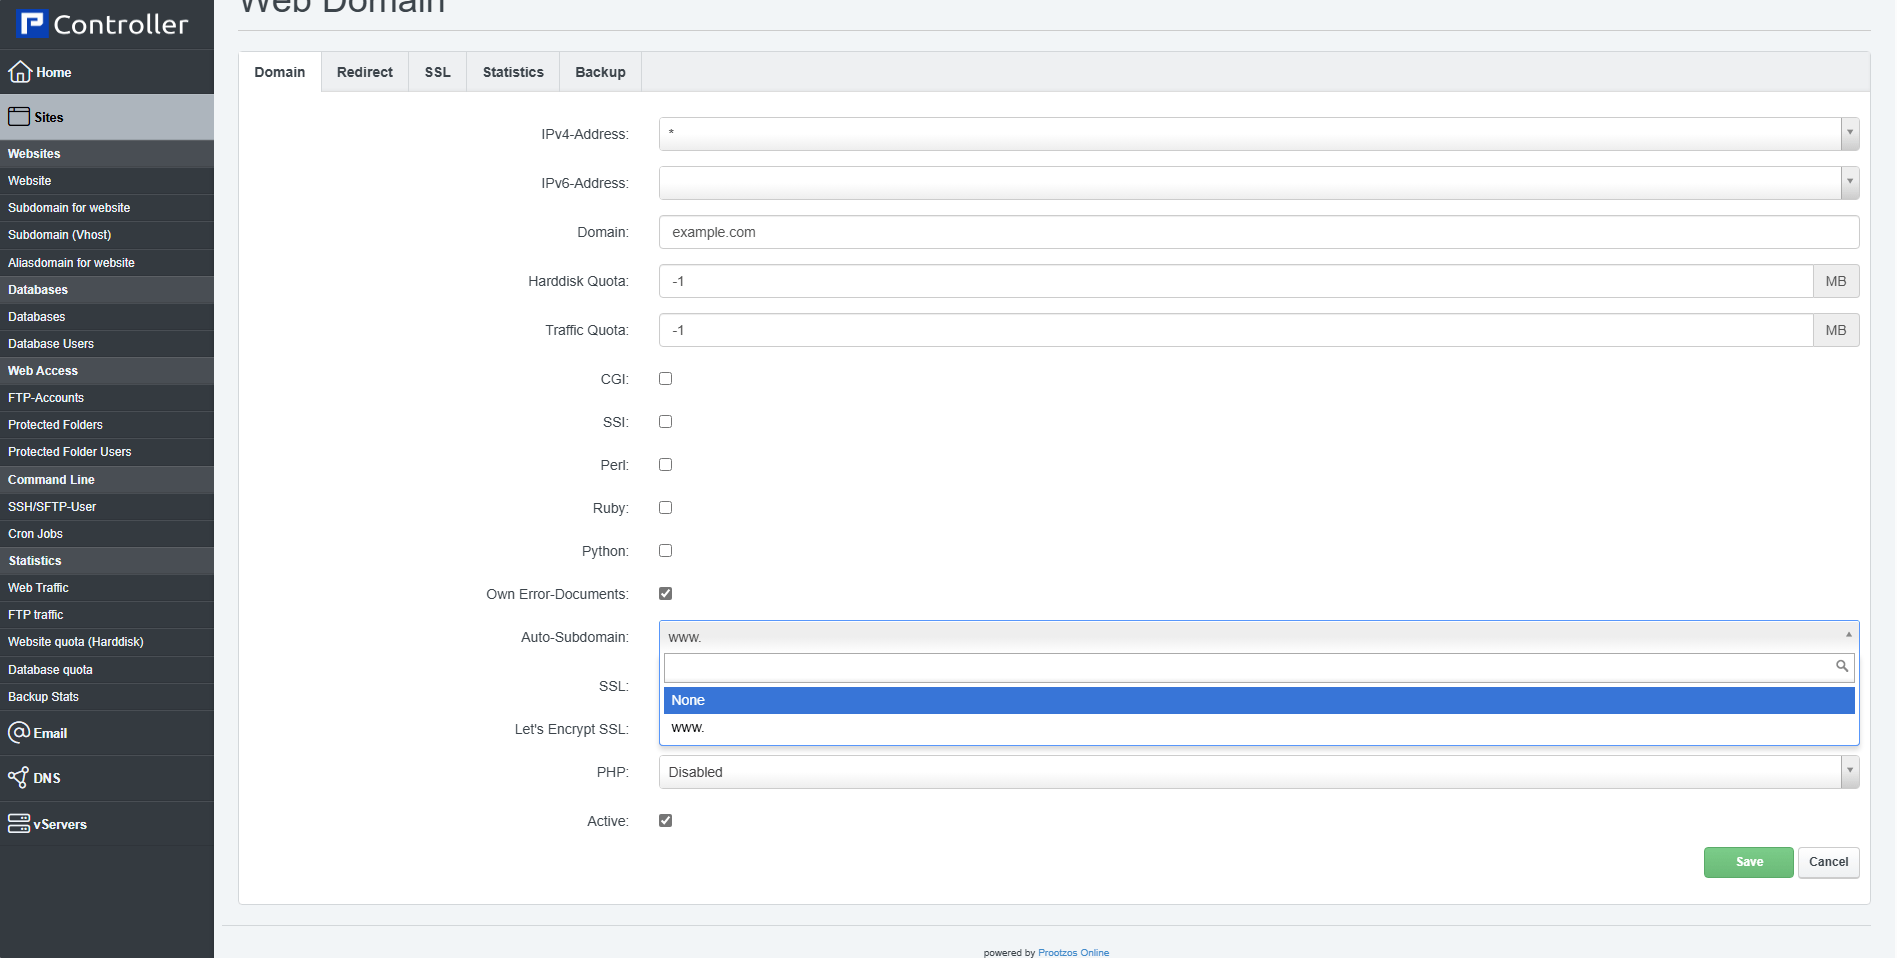
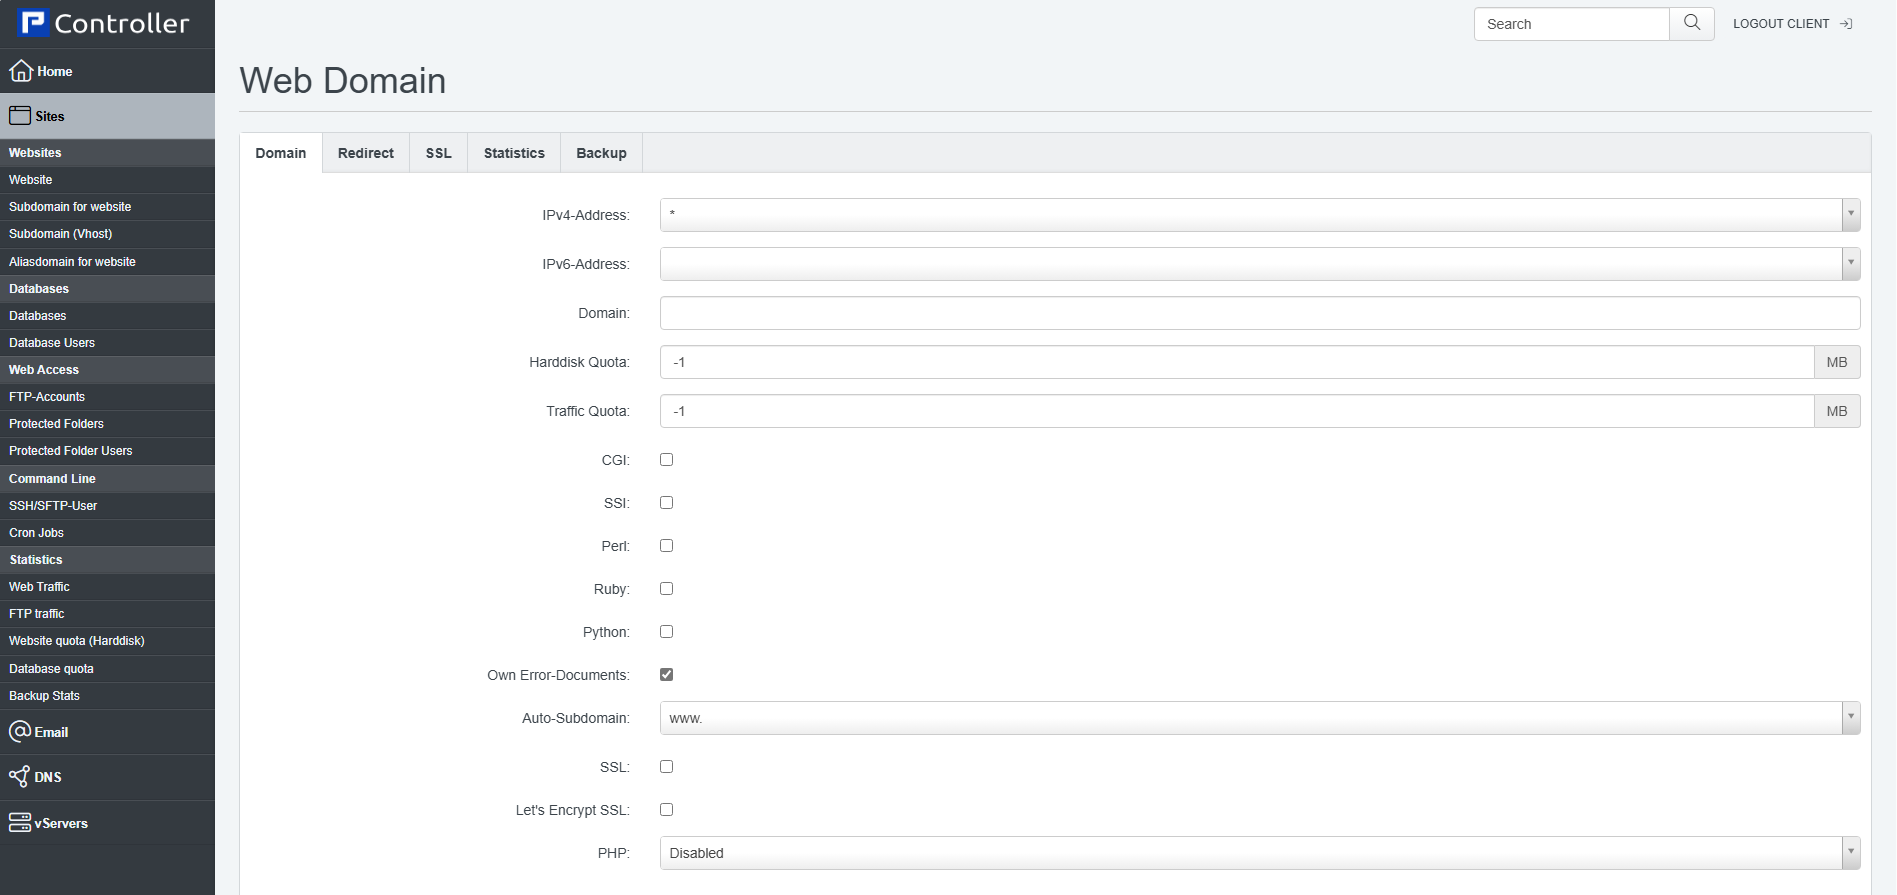
This is where the web site is actually created. Here you specify the web site domain, the client who owns the web site, the IP address, quota, the features (like PHP, CGI, SSL, etc.) that the web site will have, etc. Please not that some fields and options are not available for shared hosting users. The form has the following fields:
- Server: If more than one server is available, you can select the server on which the web site will be created.
- Client: Here you select the client that owns the new web site.
- IPv4-Address: Select the IPv4 address on which the web site will respond. * means all available IP addresses. Please note that you still might have to create the appropriate DNS records for your domains so that they point to the correct IP address.
- IPv6-Address (optional): Select the IPv6 address on which the web site will respond. If no IPv6 address is selected, no IPv6 vhost will be created. Please note that you still might have to create the appropriate DNS records for your domains so that they point to the correct IPv6 address.
- Domain: This is the main domain of your web site, e.g. example.com (without subdomain like www).
- Harddisk Quota: This is the max. amount of web space (in MB) that is available for the web site. -1 means unlimited.
- Traffic Quota: This is the max. amount of traffic per month (in MB) that is available for the web site. -1 means unlimited.
- CGI: Allows the web server to execute cgi scripts in a certain directory (cgi-bin).
- SSI: Activates Server Side Includes (SSI) (file extension .shtml).
- Ruby (Apache only): Allows the web server to execute Ruby scripts (file extensions .rb and .rbx).
- Python (Apache only): Allows the web server to execute Python scripts (file extension .py).
- Perl (Apache only): If you have mod_perl installed, this option allows you to run .pl scripts from within your document root and subdirectories instead of from cgi-bin.
- SuEXEC (Apache only): This makes that CGI scripts (including PHP scripts that are executed as Fast-CGI or CGI) are executed as the user and group of the current web site. You should check this checkbox for security reasons. This does not apply to PHP scripts that are executed under Mod-PHP and SuPHP.
- Own Error-Documents: Allows to define your own error pages instead of using the standard ones.
- Auto-Subdomain: Here you can define whether you want no automatic subdomain for the web site (in this case you can access the site only by using the domain, e.g. http://example.com), an automatic www subdomain (you can then access the site using http://example.com and http://www.example.com), or a wildcard subdomain (*.) which means you can access the site with any subdomain that does not point to another web site.
- SSL: With this checkbox you can enable SSL for this web site. Please note that you can have only one SSL web site per IP address, and it is not possible to use a wildcard (*) in the IP-Address field.
- Let's Encrypt SSL: With this checkbox the automatic creation of a free Let's Encrypt SSL Certificate can be enabled. The SSL tab gets hidden as the SSL cert is managed completely by Let's encrypt. Let's encrypt will try to download a security token from all domains that belong to this website, this security token gets generated automatically and is included in the website URL tree with an alias in the web server configuration automatically. This procedure requires that all domains that are assigned to the website (the main domain in the domain field of the site, the auto subdomain and all alias- or subdomains that you added to this site) must be reachable from outside, ensure that you setup proper DNS records for all these domains and subdomains first. Redirects may cause the Let's Encrypt verification to fail.
- PHP: You can disable/enable PHP for this web site here. If you want to enable PHP, the following five modes are available: Fast-CGI (Apache only), CGI (Apache only), Mod-PHP (Apache only), SuPHP (Apache only), PHP-FPM (Apache and nginx).
- Fast-CGI:
- Advantages:
- Scripts will be executed with user privileges of the web site;
- More than one PHP version can be run as FastCGI;
- Might be better in speed compared to CGI and suPHP.
- Disadvantages:
- php.ini values cannot be changed via PHP scripts, vhost files, .htaccess files. But it is possible to use the Custom php.ini settings field on the Options tab of a web site in Controller to specify custom php.ini settings (see chapter 2.1.1 Website).
- Advantages:
- CGI:
- Advantages:
- Scripts will be executed with user privileges of the web site;
- More than one PHP version can be run as CGI.
- Disadvantages:
- CGI might use a little more memory (RAM) - therefore, it's not recommended to run PHP as CGI on slow virtual servers;
- php.ini values cannot be changed via PHP scripts, vhost files, .htaccess files. But it is possible to use the Custom php.ini settings field on the Options tab of a web site in Controller to specify custom php.ini settings (see chapter 2.1.1 Website).
- Advantages:
- Mod-PHP:
- Advantages:
- Speed;
- Needs less memory (RAM) than CGI;
- php.ini values can be changed via PHP scripts, vhost files, .htaccess files.
- Disadvantages:
- Scripts are being executed with Apache privileges, which might lead to some security related problems;
- Only one version of PHP can be installed as Apache module;
- You cannot use the Custom php.ini settings field on the Options tab of a web site in Controller to specify custom php.ini settings (see chapter 2.1.1 Website).
- SuPHP:
- Advantages:
- Scripts will be executed with user privileges of the web site;
- Each vhost can have its own php.ini file;
- Needs less memory (RAM) than CGI;
- More than one PHP version can be run as suPHP.
- Disadvantages:
- php.ini values cannot be changed via PHP scripts, vhost files, .htaccess files. But it is possible to use the Custom php.ini settings field on the Options tab of a web site in Controller to specify custom php.ini settings (see chapter 2.1.1 Website);
- SuPHP might be a little slower than mod_php.
- Advantages:
- PHP-FPM:
- Advantages:
- Scripts will be executed with user privileges of the web site;
- More than one PHP version can be run as PHP-FPM;
- Adaptive process spawning;
- Advanced process management with graceful stop/start;
- Emergency restart in case of accidental opcode cache destruction;
- Might be better in speed compared to CGI and suPHP.
- Disadvantages:
- php.ini values cannot be changed via PHP scripts, vhost files, .htaccess files. But it is possible to use the Custom php.ini settings field on the Options tab of a web site in Controller to specify custom php.ini settings (see chapter 2.1.1 Website).
- Advantages:
- HHVM:
- This mode uses the HipHopVirtualMachine, developed by Facebook. HHVM is fast, but it does not support all PHP functions. For most users, PHP 7 in PHP-FPM mode will be a better option.
- Advantages:
- Recommendations:
- Apache:
- High-Traffic Web Sites: Fast-CGI + suExec or PHP-FPM + suExec
- Low-Traffic Web Sites: CGI + suExec or SuPHP
- nginx:
- PHP-FPM
- Apache:
- Fast-CGI:
- PHP Version (FastCGI and PHP-FPM only): If more than one PHP version is available, you can select the desired PHP version for this web site here. Please note that this feature is available only for FastCGI and PHP-FPM.
- Web server config: Here you can select a predefined configuration snippet that gets included in the virtual host configuration of the website. The configuration snippets can be added by our system administrators after request.
- Active: Defines whether this web site is active or not.
Redirect
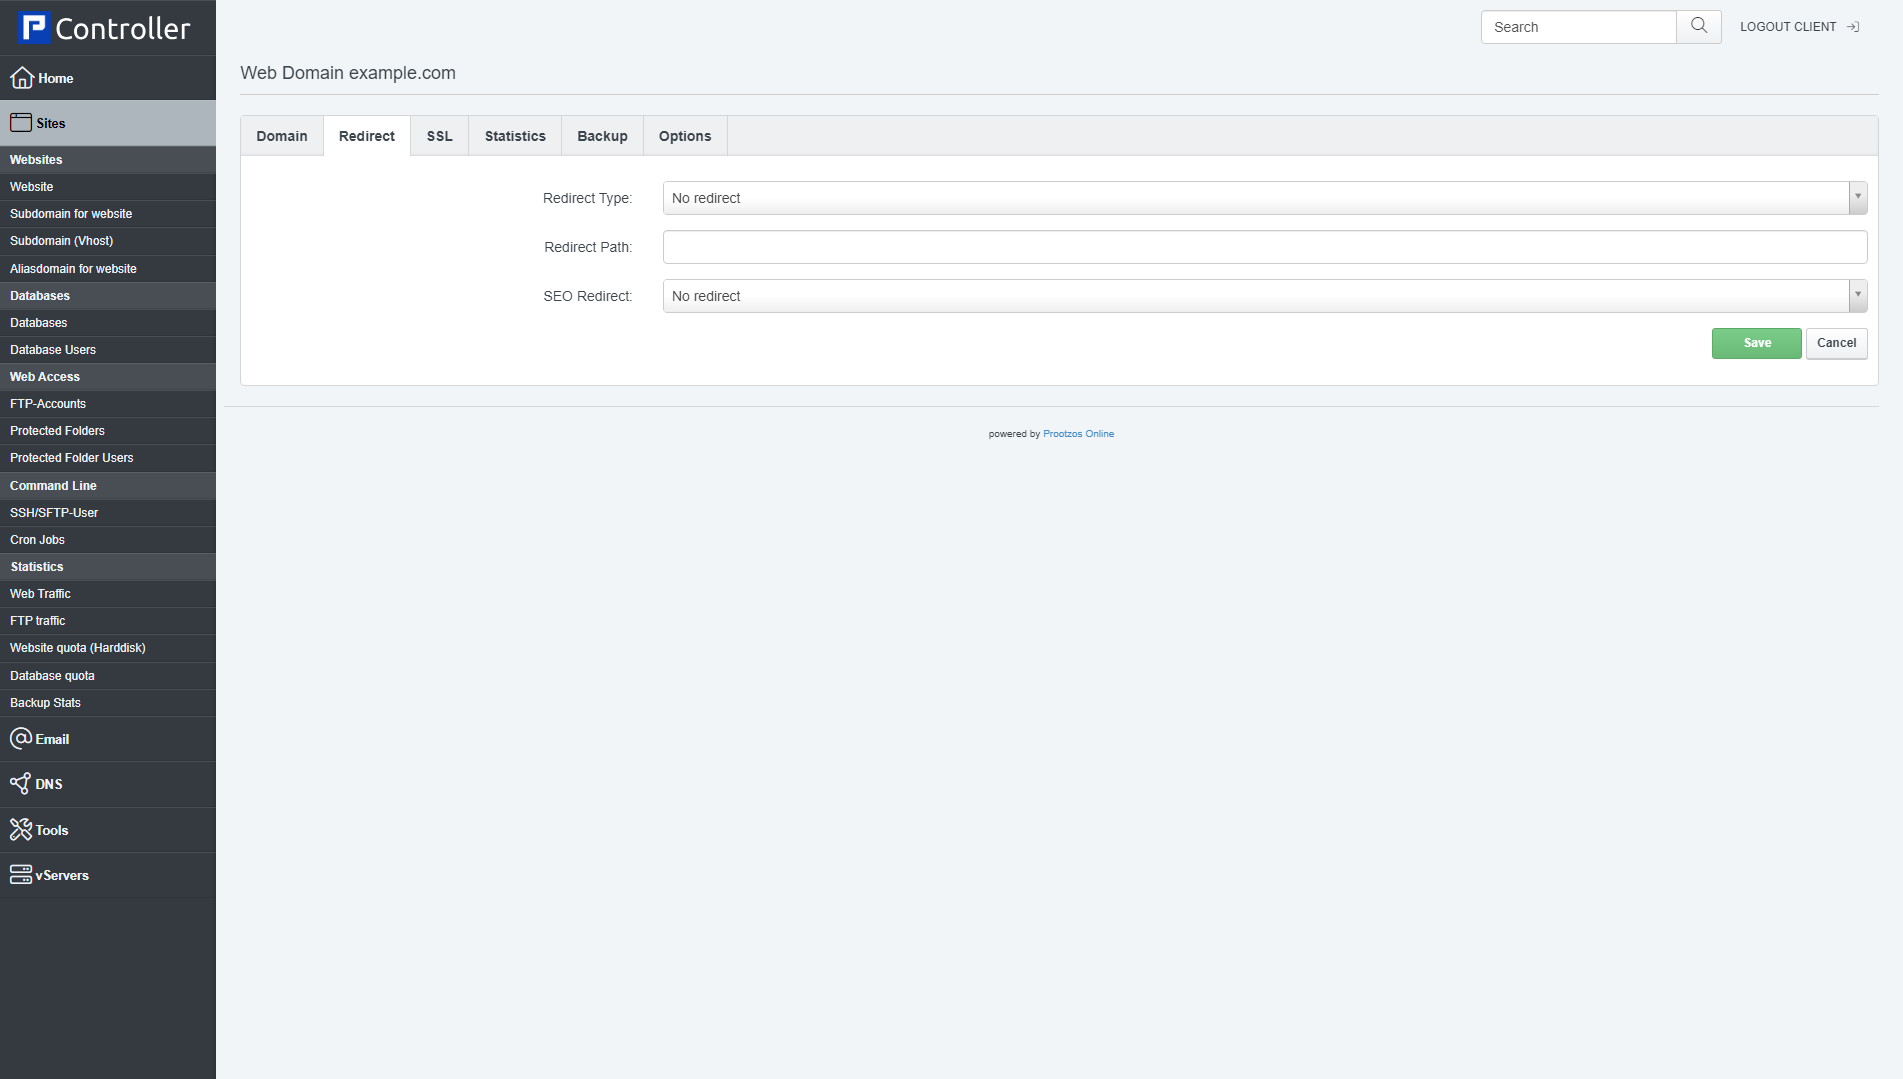
This form allows you to redirect the web site to another web site or to a specific directory on the server. This is done by using Apache/nginx rewrite rules.
- Redirect Type: Here you can specify if you want to disable/enable a redirect, and if you decide to use a redirect, which flag to use.
- Flags:
- No flag: Don't use any flags.
- R (Apache only): Use of the [R] flag causes a HTTP redirect to be issued to the browser. If a fully-qualified URL is specified (that is, including http://servername/ ) then a redirect will be issued to that location. Otherwise, the current server name will be used to generate the URL sent with the redirect.
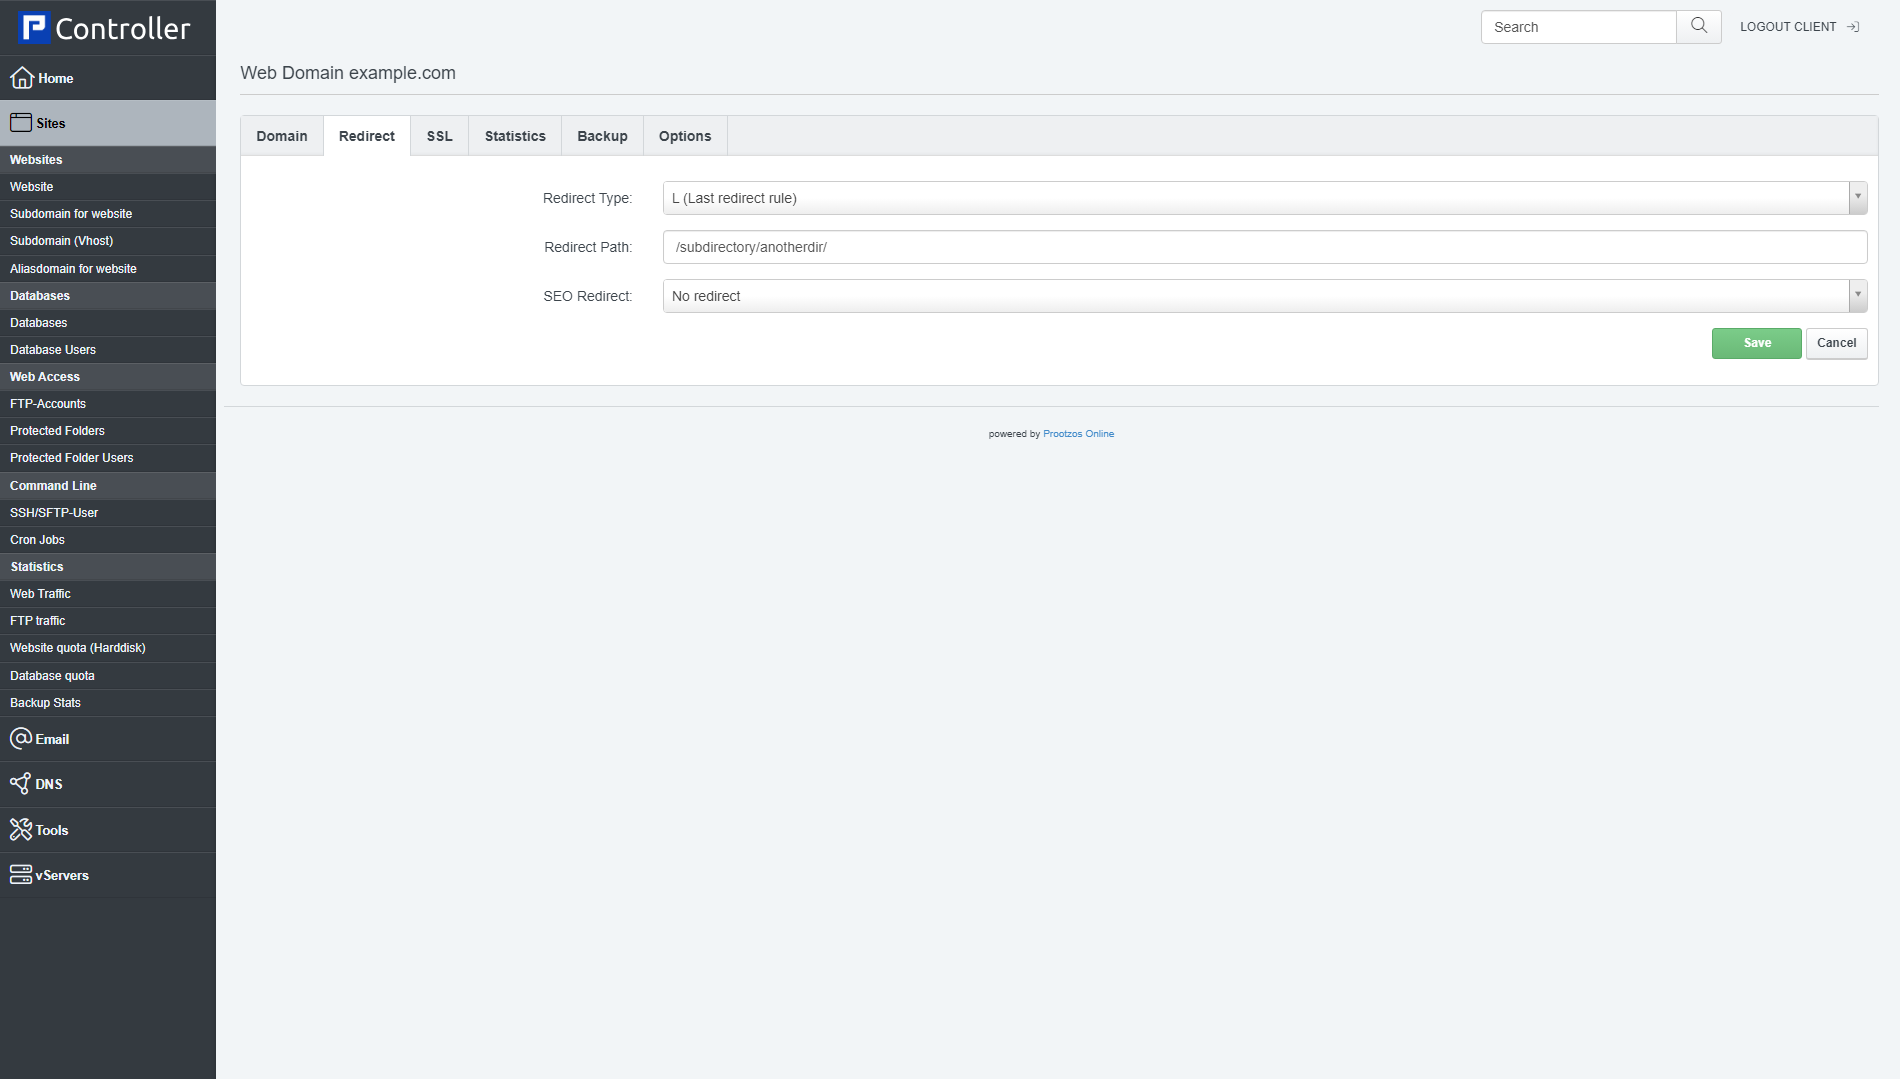
- L (Apache only): The [L] flag causes mod_rewrite to stop processing the rule set. In most contexts, this means that if the rule matches, no further rules will be processed.
- R,L (Apache only): You will almost always want to use [R] in conjunction with [L] (that is, use [R,L]) because on its own, the [R] flag prepends http://thishost[:thisport] to the URI, but then passes this on to the next rule in the ruleset, which can often result in 'Invalid URI in request' warnings.
- last (nginx only): Completes processing of rewrite directives, after which searches for corresponding URI and location.
- break (nginx only): Completes processing of rewrite directives and breaks location lookup cycle by not doing any location lookup and internal jump at all.
- redirect (nginx only): Returns temporary redirect with code 302; it is used if the substituting line begins with http://.
- permanent (nginx only): Returns permanent redirect with code 301.
- proxy (nginx only): This option (which does not refer to an official nginx rewrite flag) allows to proxy requests which allows to display contents from somewhere else without changing the web site URL. If Redirect Path is an external URL, the contents is fetched from that URL ($request_uri is appended to that URL); if Redirect Path is a directory or the URL is local (i.e., it points to a subdirectory of the current web site, like the web site address is http://www.example.com, and you add http://www.example.com/subdir to the Redirect Path field), the request isn't actually proxied, but the web site's document root is set to the subdirectory (so that the document root is something like /var/www/example.com/web/subdir instead of /var/www/example.com/web). If the proxy option is selected, a further field called Proxy Directives is added to the Options tab where you can add custom nginx proxy directives (directives like, for example, proxy_set_header, proxy_redirect, proxy_buffer_size, etc.) - these will be added to the vhost configuration if Redirect Path is an external URL.
- Flags:
More details about flags can be found here:
-
- Apache: http://httpd.apache.org/docs/2.2/rewrite/flags.htm
- nginx: http://wiki.nginx.org/NginxHttpRewriteModule#rewrite
- Redirect Path: This is the target, i.e., the path (full path or path relative to the document root) or URL where the redirect should point to.
- SEO Redirect: Here you can do search-engine optimization for your website and configure a redirect to avoid duplicate content. You can redirect your non-www website to your www website (e.g. visitors to example.com will be redirected permanently to www.example.com) or vice versa (www.example.com to example.com). These are the options:
- No Redirect: Don't use any SEO redirect.
- domain.tld => www.domain.tld: Redirect requests for example.com to www.example.com.
- www.domain.tld => domain.tld: Redirect requests for www.example.com to example.com.
- *.domain.tld => domain.tld: Redirect all subdomains of example.com (including www.example.com) to example.com.
- *.domain.tld => www.domain.tld: Redirect all subdomains (including example.com itself) to www.example.com.
- * => domain.tld: Redirect everything that is not example.com to example.com (this includes subdomains and also alias domains).
- * => www.domain.tld: Redirect everything that is not www.example.com to www.example.com (this includes example.com, subdomains and also alias domains).
- Rewrite HTTP to HTTPS: Redirect incoming HTTP requests to HTTPS. This option should be enabled on HTTPS only websites to avoid duplicate content problems when someone accesses your website with HTTP.If you want to do a URL redirect, you should use the R,L flags, while for a directory redirect it is recommended to justuse the L flag.If you want to do a URL redirect, please specify the redirect target URL in the Redirect Path field (e.g. http://www.someotherwebsite.com/subdir/ or http://www.someotherwebsite.com/).Please note that the URL should have a trailing slash:
If you want to do a redirect to a subdirectory of your web site, please specify the subdirectory or the path to the subdirectory (relative to the document root of your web site) in the Redirect Path field. Please note that the path must begin and end with a slash (e.g. /subdirectory/anothersubdirectory/):
SSL
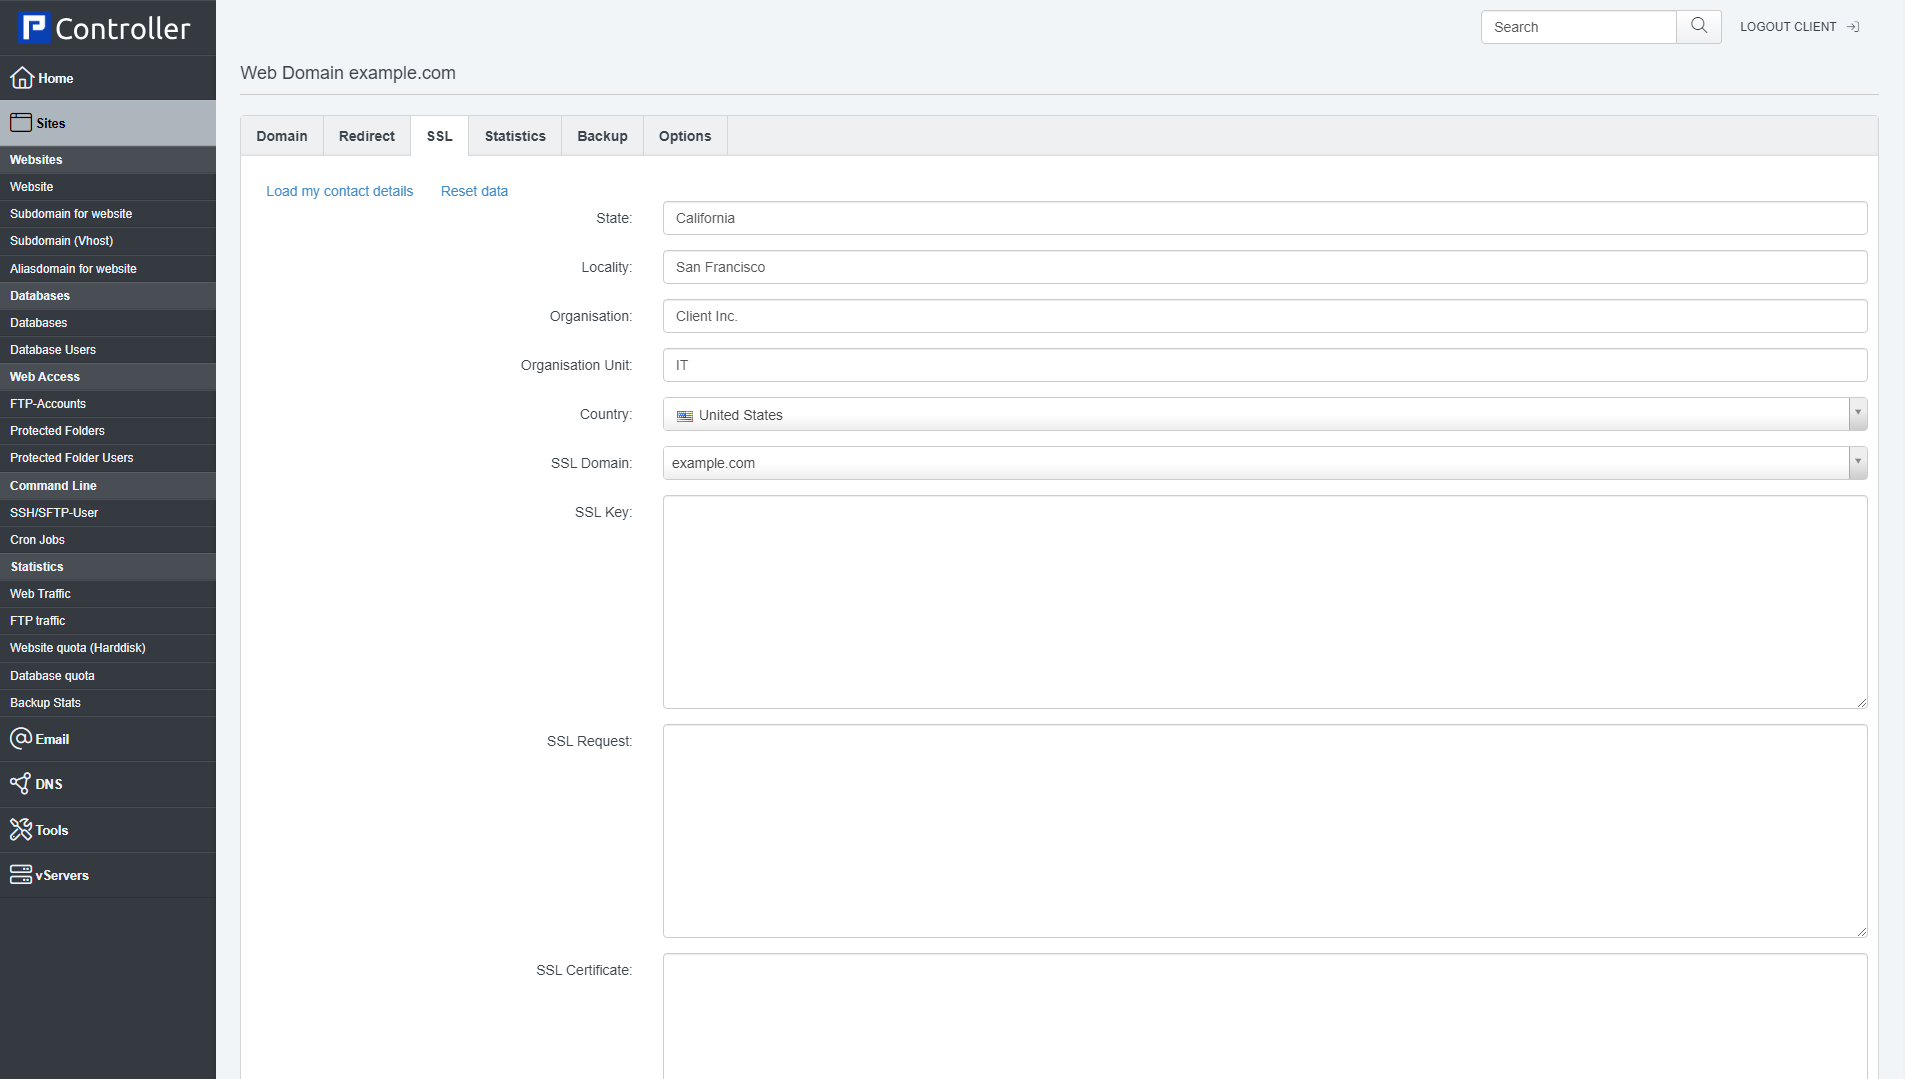
On the SSL tab you can create a self-signed SSL certificate together with a certificate signing request (CSR) that you can use to apply for an SSL certificate that is signed by a trusted certificate authority (CA) such as Verisign, Comodo, Thawte, etc. It's not necessary to buy such a trusted SSL certificate, but you should note that if you use a self-signed SSL certificate, browsers will display a warning to your visitors.
Please note that you can have just one SSL web site per IP address, unless you use SNI (In our servers we use SNI). SNI is short for Server Name Indication and allows you to run multiple SSL vhosts on one IP address. Please note that currently SNI is not supported by all browsers/operating systems. Browsers/clients with support for TLS server name indication:
- Opera 8.0 and later (the TLS 1.1 protocol must be enabled)
- Internet Explorer 7 or later (under Windows Vista and later only, not under Windows XP)
- Firefox 2.0 or later
- Curl 7.18.1 or later (when compiled against an SSL/TLS toolkit with SNI support)
- Chrome 6.0 or later (on all platforms - releases up to 5.0 only on specific OS versions)
- Safari 3.0 or later (under OS X 10.5.6 or later and under Windows Vista and later
To find out if your browser supports SNI, you can go to https://alice.sni.velox.ch/.
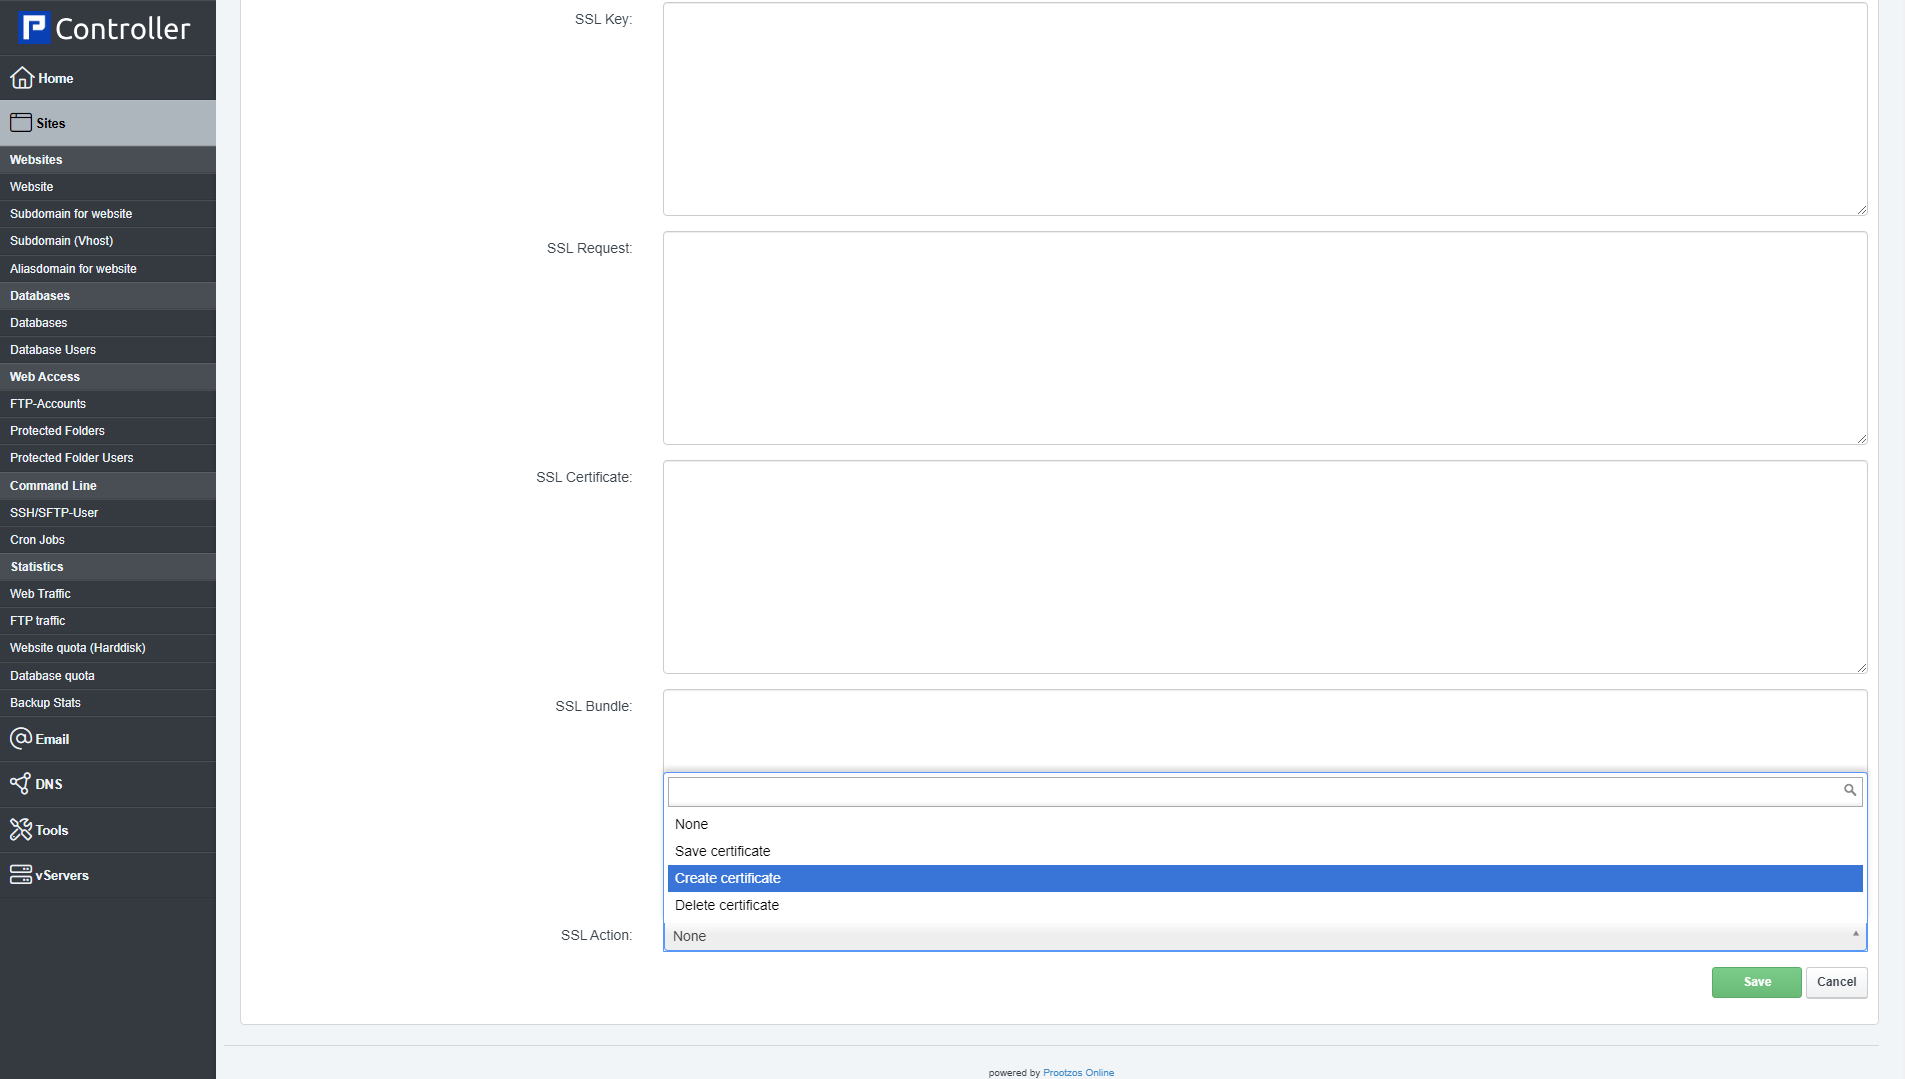
To create a self-signed certificate, please fill out the fields State, Locality, Organisation, Organisation Unit, Country, and SSL Domain, and then select Create Certificate from the SSL Action drop-down menu, and click on Save. Leave the fields SSL Key, SSL Request, SSL Certificate, and SSL Bundle empty - the fields SSL Key, SSL Request and SSL Certificate will be filled out by the system.
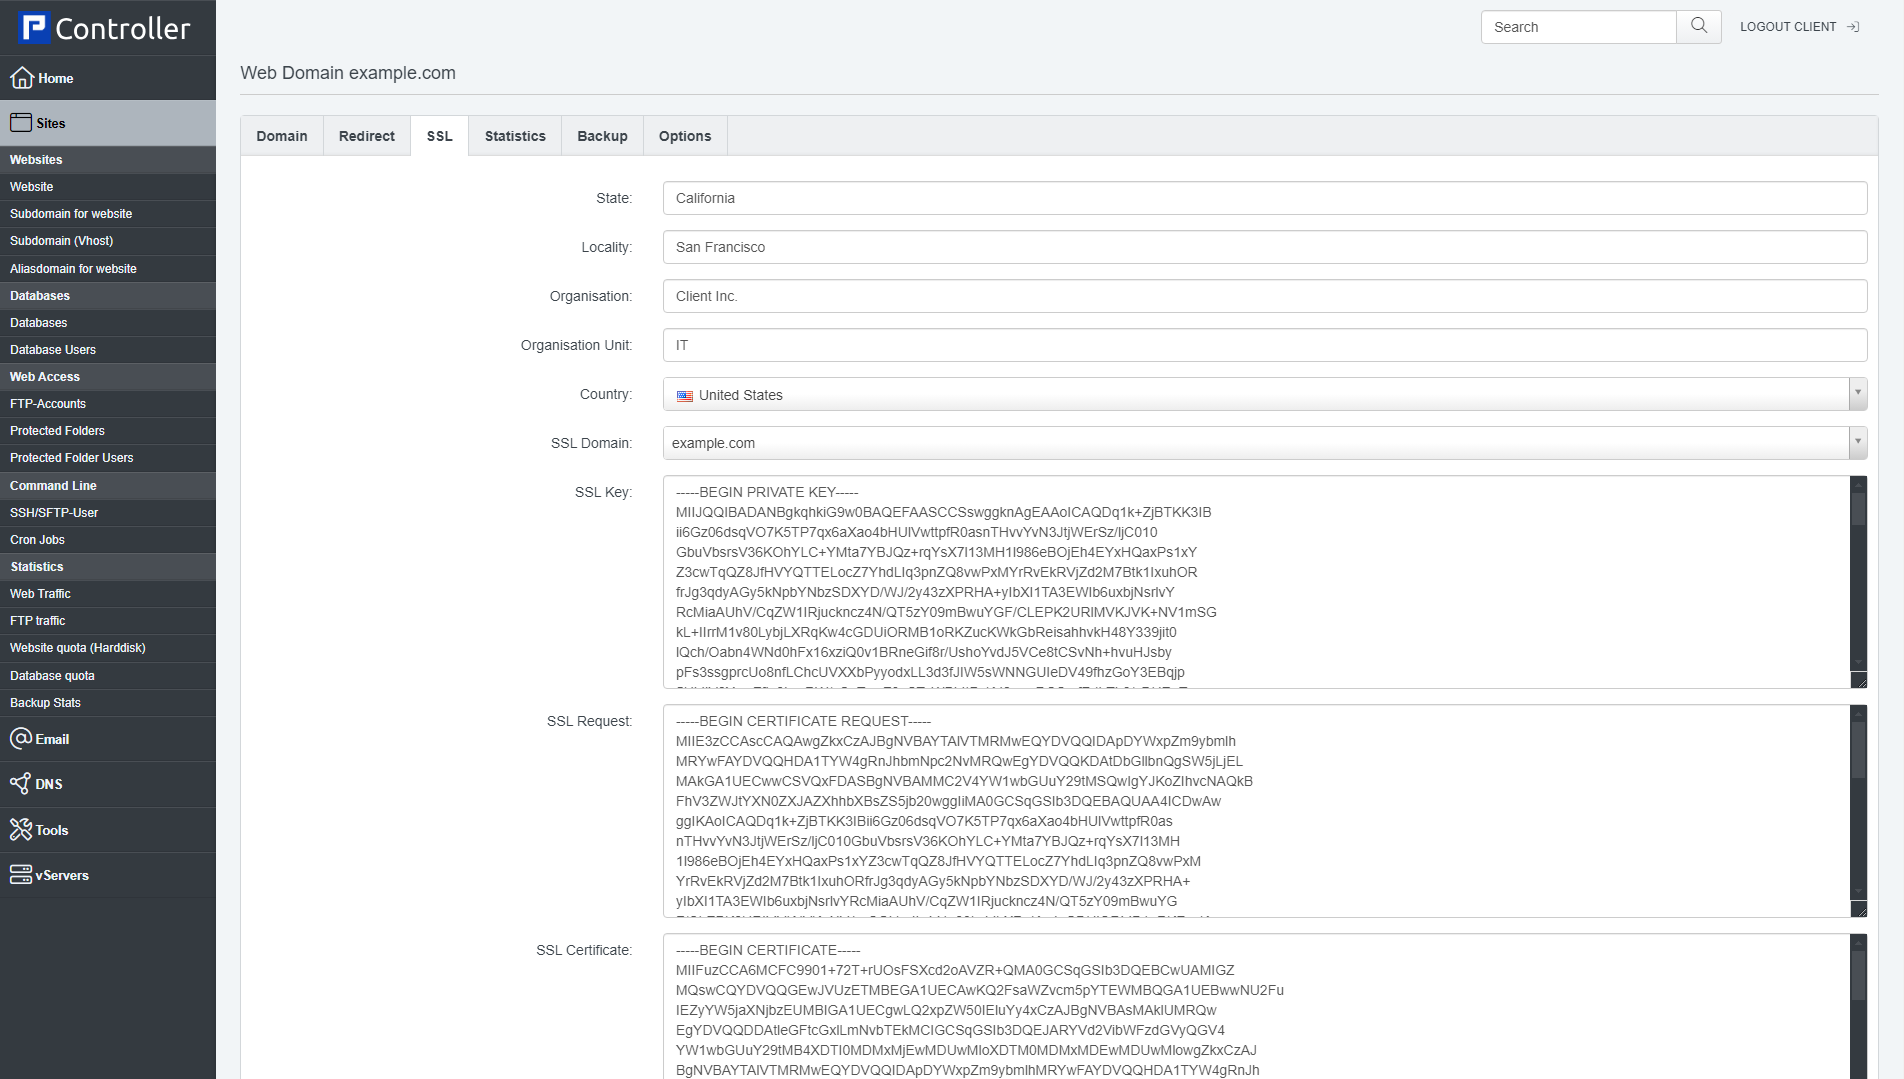
After the self- signed certificate was created, you will find data in the SSL Key, SSL Request, and SSL Certificate fields (it can take one or two minutes until the data appears in the fields):
If you want to buy an SSL certificate from a trusted CA, you have to copy the data from the SSL Request field - this is the certificate signing request (CSR). With this CSR, you can apply for a trusted SSL certificate at your CA - the CA will create an SSL certificate from this CSR, and you can paste the trusted SSL certificate into the SSL Certificate field. Sometimes your CA will also give you an SSL bundle - paste this into the SSL Bundle field. Select Save Certificate from the SSL Action drop-down menu and click on the Save button. You have just replaced your self-signed certificate with a trusted SSL certificate.
If you already have an SSL certificate that you would like to use with this web site, it's not necessary to create a self-signed certificate first. Just paste the key, the certificate, the bundle
certificate (if needed) and the CSR (optional, but will be needed if you want to buy a new certificate for the same key, for example after the old certificate has expired) in the appropriate
fields, select Save Certificate from the SSL Action drop-down menu and click on Save (the other fields such as State, Organisation, etc. can be left empty).
To delete a certificate, select Delete Certificate from the SSL Action drop-down menu and click on the Save button.
Here's the meaning of the other fields on the SSL tab:
- State: The state or province where your organization is located. Can not be abbreviated.
Examples: Attika, Florida, Bavaria, Noord-Holland, etc. - Locality: The city where your organization is located.
Examples: Athens, London, Paris, Seattle, Hamburg, etc. - Organisation: The exact legal name of your organization. Do not abbreviate your organization name.
Examples: Prootzos Online MIKE, My Company GmbH, etc. - Organisation Unit: This entry is for the name of the unit in your organization.
Examples: IT, Marketing, Sales, Development, etc. - Country: The two-letter ISO abbreviation for your country.
Examples: GR for Greece, AU for Australia, DE for Germany, US for the United States, NL for The Netherlands, etc. - SSL Domain: A fully qualified domain name that resolves to the SSL web site.
For example, if you intend to secure the URL https://ssl.example.com, then the SSL Domain must be ssl.example.com. This must be an exact match. Some CAs automatically include www.example.com in the certificate if you create a CSR for example.com, while for other CAs, you need to create a CSR for www.example.com if you want to have both example.com and www.example.com covered - it's therefore recommended to create CSRs for www.example.com instead of just example.com. If you want to create a wildcard certificate, please select *.example.com in this field.
Statistics
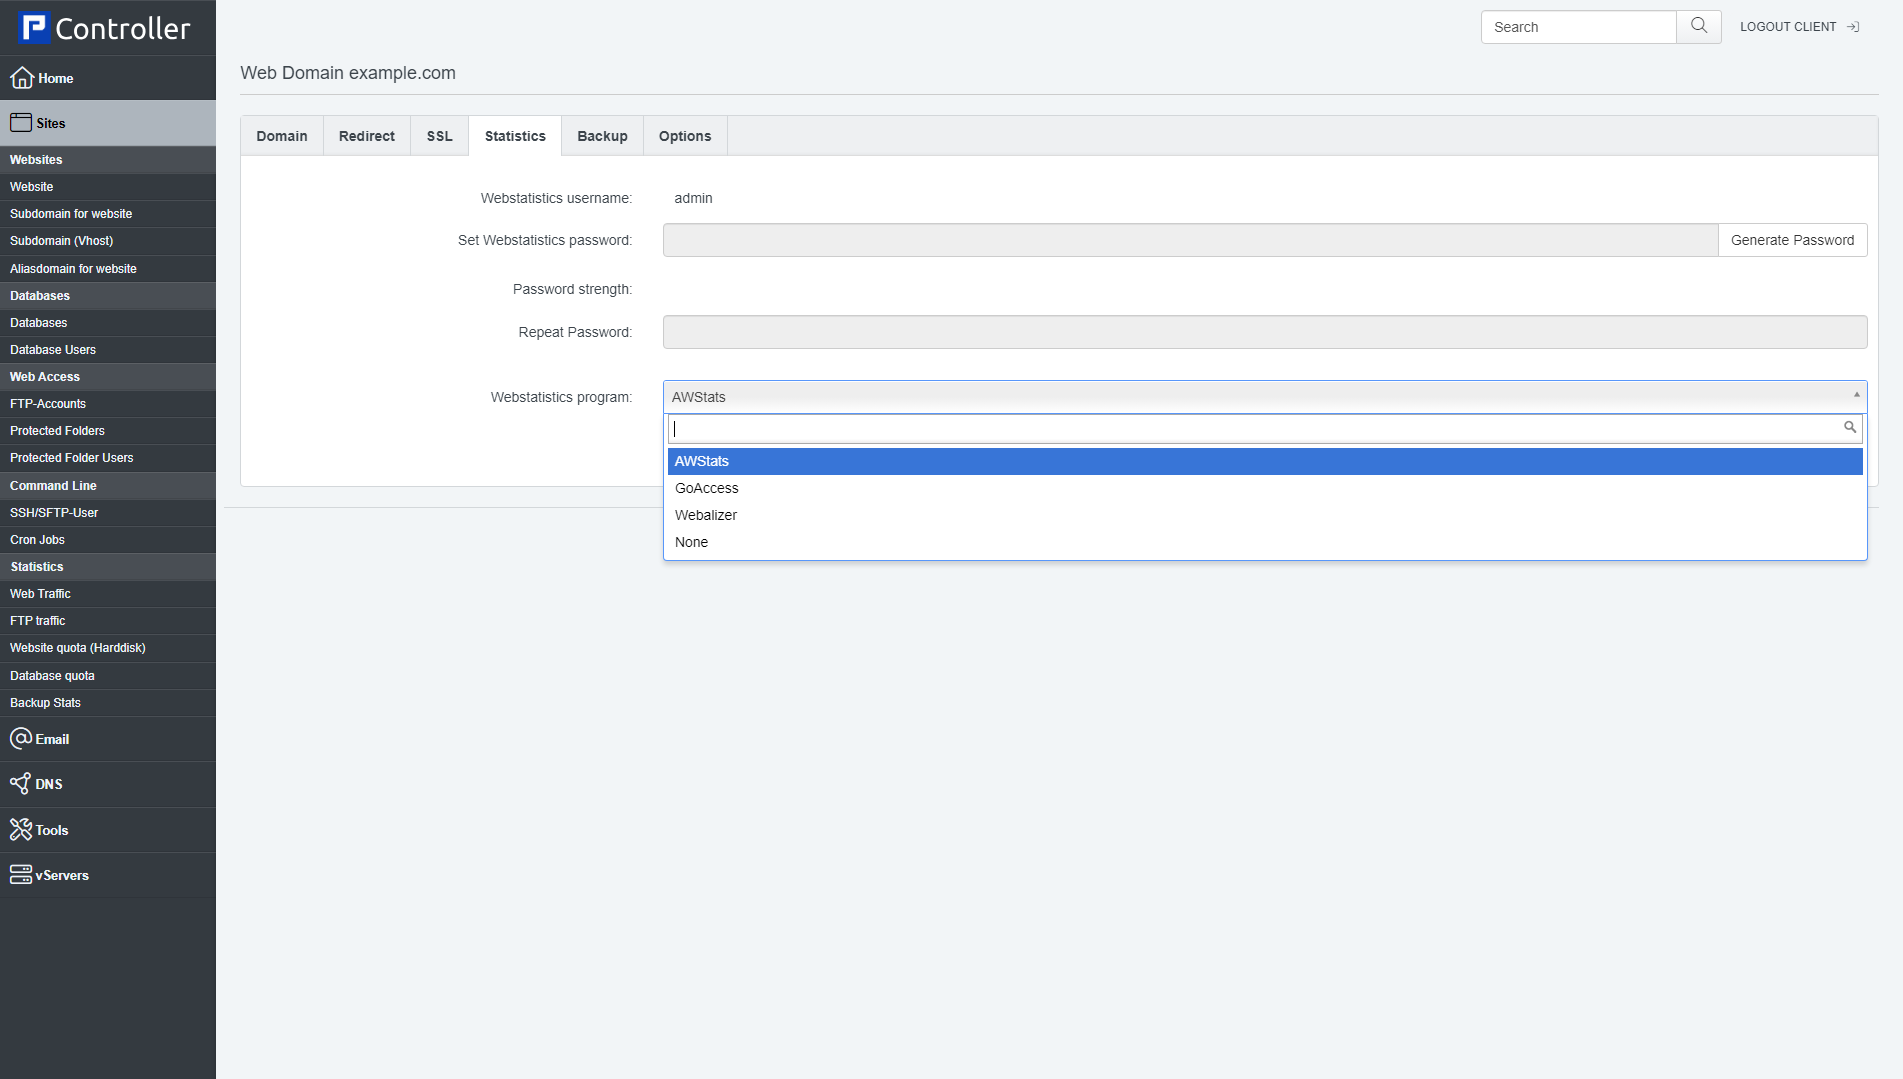
Controller can create web statistics for your web sites, but only if you specify a password for the webstatistics user - these will be generated once a day (at 0.30h) and are available in the /stats folder of your web site (e.g. http://www.example.com/stats). You can password-protect that directory by specifying a password in the Webstatistics password field (the Webstatistics username is defined by Controller, it's admin).
In the Webstatistics program drop-down menu, you can select the software that will create the statistics for you - you have the choice between Webalizer, GoAccess and AWStats.
- Webstatistics username: This is preset by Controller, the username is admin.
- Webstatistics password: Type in a password for the user (or use the Generate Password link to have Controller generate one for you).
- Repeat Password: Confirm your password.
- Webstatistics program: Select if you want to use Webalizer, GoAccess or AWStats for generating the web site statistics or select None to disable website statistics.
Backup
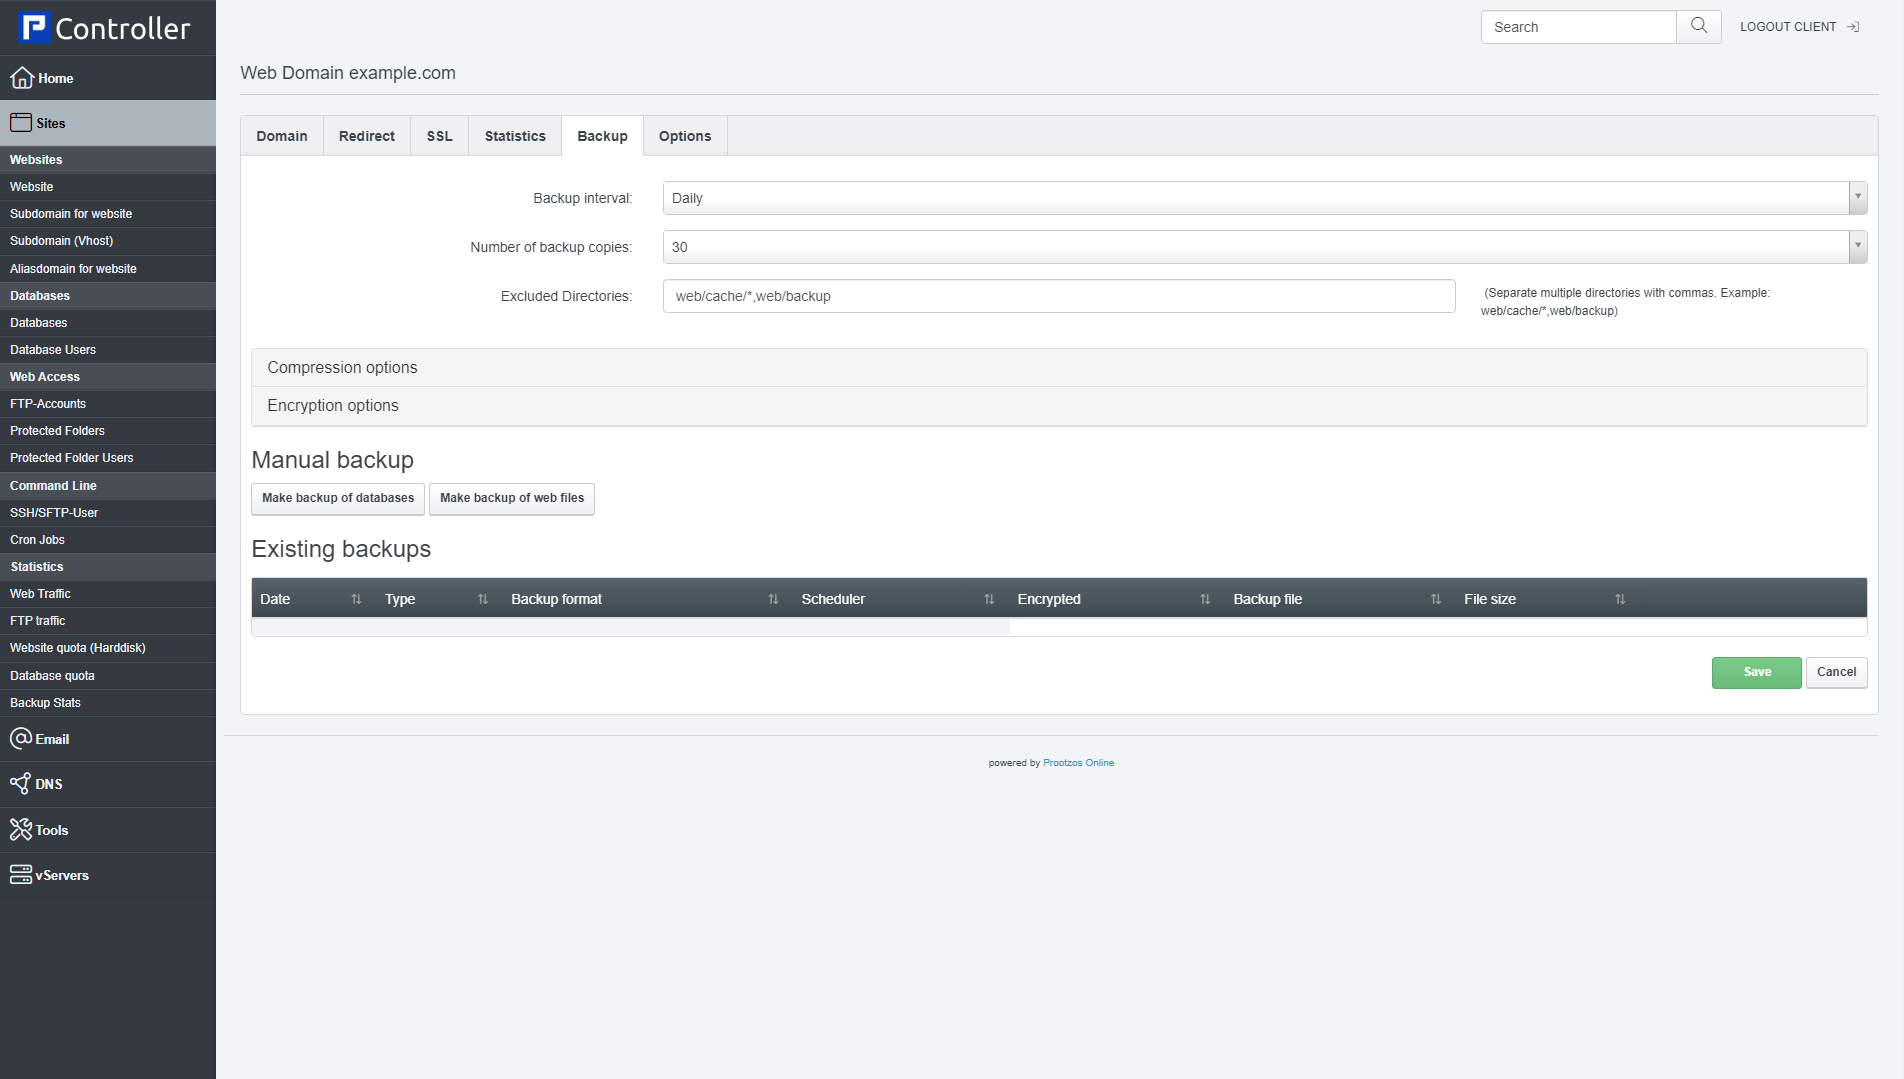
On the Backup tab you can specify whether you want to create backups of the current web site and all MySQL databases that belong to the web site (separate backups will be created for the web site and for the MySQL dumps so that it is possible to restore either one or the other). If the document root of the web site is /var/clients/client1/web1/web, the contents of the /var/clients/client1/web1 directory (including the web folder, but excluding the log folder) will be compressed and stored in the backup directory (the default directory is /var/backup). For web1 Controller would create the subdirectory /var/backup/web1 and store the backups in that directory.
- Backup interval: Select whether you want Controller to create backups for this web site, and if so, how often (daily/weekly/monthly).
- Number of backup copies: Specify how many backups should be kept on the system. For example, if you select to have a daily backup and pick 10 in the Number of backup copies field, the system will keep backups of the last ten days; backups that are older will automatically be deleted.
- Excluded directories: Directories that shall not be backed up can be specified here. The directories are relative to the website root directory. Separate multiple directories with commas. Example: web/cache/*,web/backup
To restore a backup, click on the Restore button next to the backup you want to restore. The restore will be processed in the next few minutes. If you want to download a backup, click on the Download button; within the next few minutes, the backup will be placed in the backup directory from where you can download it via FTP.
Options
(This tab is visible only for the Reseller Clients.)
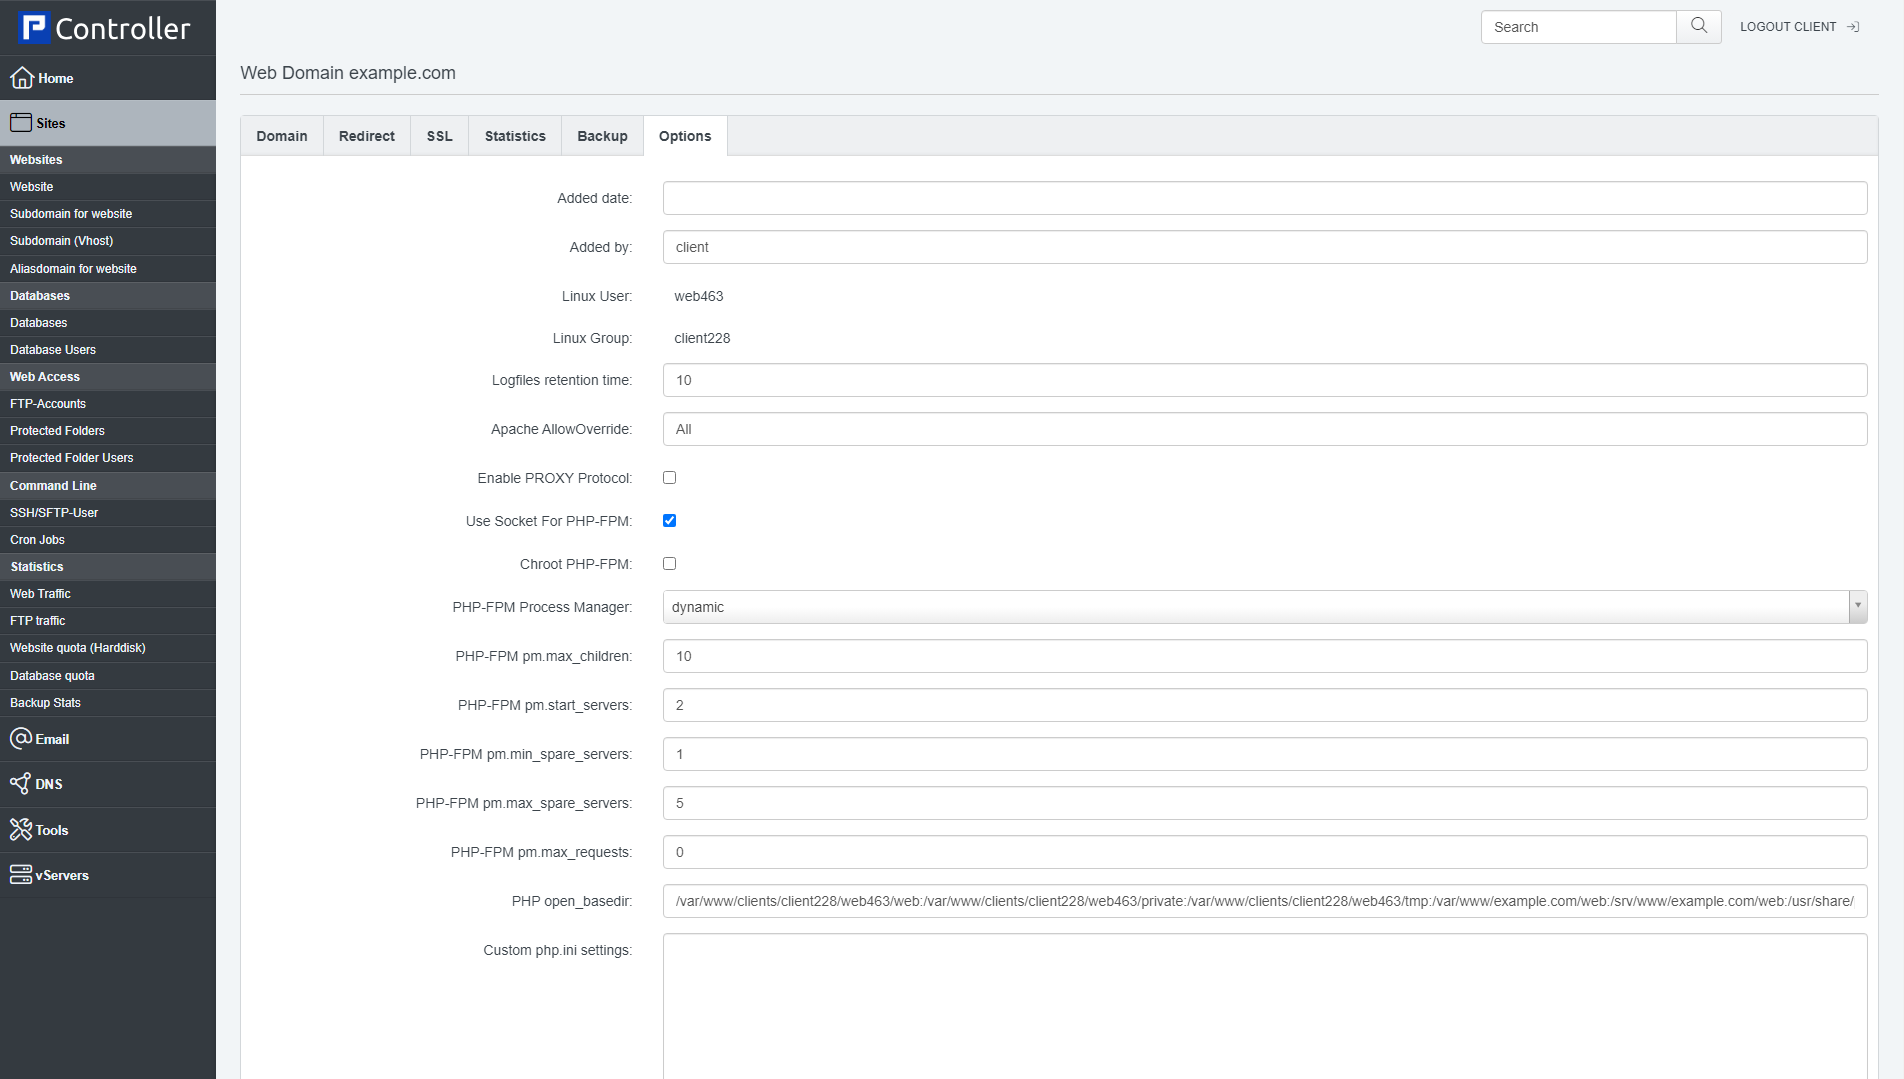
- Added date: The date when this website has been added.
- Added by: The Controller user that added this website.
- Linux User: This shows the Linux user under which this web site is run. If you have chosen PHP Fast-CGI + SuEXEC, PHP CGI + SuEXEC or SuPHP, this is the user under which your PHP scripts will be executed. This setting cannot be changed.
- Linux Group: This shows the Linux group under which this web site is run. If you have chosen PHP Fast-CGI + SuEXEC, PHP CGI + SuEXEC or SuPHP, this is the group under which your PHP scripts will be executed. This setting cannot be changed.
- Apache AllowOverride (Apache only): Specifies what directives are allowed in .htaccess files. Possible values: All|None|AuthConfig|FileInfo|Indexes|Limit|Options[= Option,...]
See http://httpd.apache.org/docs/2.2/mod/core.html#allowoverride for more details. - Use Socket For PHP-FPM: By default, Controller configures TCP connections for PHP-FPM. If you check this box, a socket connection is configured instead which reduces networking overhead. In addition to that, no port is used.
- PHP-FPM Process Manager: Select the desired PHP-FPM process manager (static, dynamic, or ondemand - ondemand requires PHP Version 5.3.9 or later). For minimal resource usage, ondemand is the preferred value. Depending on what you select here, the following PHP-FPM settings fields will appear or disappear. Here is a brief description of the three process managers:
- static - a fixed number (pm.max_children) of child processes;
- dynamic - the number of child processes are set dynamically based on the following directives. With this process management, there will be always at least 1 children.
- pm.max_children - the maximum number of children that can be alive at the same time.
- pm.start_servers - the number of children created on startup.
- pm.min_spare_servers - the minimum number of children in 'idle' state (waiting to process). If the number of 'idle' processes is less than this number then some children will be created.
- pm.max_spare_servers - the maximum number of children in 'idle' state (waiting to process). If the number of 'idle' processes is greater than this number then some children will be killed.
- ondemand - no children are created at startup. Children will be forked when new requests will connect. The following parameter are used:
- pm.max_children - the maximum number of children that can be alive at the same time.
- pm.process_idle_timeout - The number of seconds after which an idle process will be killed.
- PHP-FPM pm.max_children: The maximum number of child processes to be created when pm is set to 'dynamic'. This value sets the limit on the number of simultaneous requests that will be served. Equivalent to the ApacheMaxClients directive with mpm_prefork. Equivalent to the PHP_FCGI_CHILDREN environment variable in the original PHP CGI.
- PHP-FPM pm.start_servers (dynamic only): The number of child processes created on startup. Default Value: min_spare_servers + (max_spare_servers - min_spare_servers) / 2
- PHP-FPM pm.min_spare_servers (dynamic only): The desired minimum number of idle server processes.
- PHP-FPM pm.max_spare_servers (dynamic only): The desired maximum number of idle server processes.
Values of PHP-FPM pm settings must be as follows:
pm.max_children >= pm.max_spare_servers >= pm.start_servers >= pm.min_spare_servers > 0 - PHP-FPM pm.max_requests: The number of requests each child process should execute before respawning. This can be useful to work around memory leaks in 3rd party libraries. For endless request processing specify '0'. Equivalent to PHP_FCGI_MAX_REQUESTS.
- PHP-FPM pm.process_idle_timeout (ondemand only): The number of seconds after which an idle process will be killed. Default Value: 10 (seconds).
- PHP open_basedir: The open_basedir directive in php.ini limits PHP file accesses (such as file opening, writing and deleting) within a designated directory so that it doesn't endanger the rest of the system in any way. With proper Apache permissions and PHP installed as an Apache module, PHP inherits whatever privileges Apache has. You can specify multiple directories here, seperated by a colon (:). To disable open_basedir, please specify the string none (leaving the field empty will not work).
- Custom php.ini settings: If this web site needs special PHP settings that differ from what's in the system's global php.ini, you can override the global PHP settings here. You can use normal php.ini syntax here. Please specify one directive per line. Please note that you can use this field only with Fast-CGI, CGI, or SuPHP - you cannot use it if you have enabled Mod-PHP for this web site. Also note that if you use this field and change your global php.ini afterwards, the changes in the global php.ini will not be available to this web site immediately - only after you modify settings of this web site in Controller so that this web site's configuration gets rewritten.
If you have defined PHP Directive Snippets, you will find these snippets listed by their name to the right of the textarea. If you click on the name of a snippet, the contents of the snippet will be inserted at the current cursor position.
Examples:memory_limit = 32M
magic_quotes_gpc = Off
file_uploads = Off - Apache Directives (Apache only): This field offers you the opportunity to write additional Apache directives into the site's virtual host container manually, one directive per line ( Directive Quick Reference). If you have defined Apache Directive Snippets, you will find thise snippets listed by their name to the right of the textarea. If you click on the name of a snippet, the contents of the snippet will be inserted at the current cursor position.
Examples:<Location '/wiki/images'>
php_admin_flag engine off
AddType text/plain .html .htm .shtml .php
</Location>
php_flag register_globals off
Options -Indexes
Options +FollowSymLinks
ErrorDocument 404 /index.php(As you can see, you can change PHP settings here as well using php_admin_flag and php_flag, but this works only if you use Mod-PHP.
You can find more details about this here: http://php.net/manual/en/configuration.changes.php) - nginx Directives (nginx only): This field offers you the opportunity to write additional nginx directives into the site's virtual host container manually, one directive per line (Directive Quick Reference). If you have defined nginx Directive Snippets, you will find thise snippets listed by their name to the right of the textarea. If you click on the name of a snippet, the contents of the snippet will be inserted at the current cursor position.
Please note that if you use a location here that is already in use in the vhost (like location ~ /. {} or location @php {}, the default behaviour of Controller is to replace the original location block with the one you specify (unless you add the string ##merge## right of the location line which will make Controller merge your location block into the original location block).
Examples:location / {
if ($query_string ~ ".+") {
return 405;
}
# pass requests from logged-in users to Apache
if ($http_cookie ~ "DRUPAL_UID" ) {
return 405;
} # pass POST requests to Apache
if ($request_method !~ ^(GET|HEAD)$ ) {
return 405;
}
error_page 405 = @nocache;
# do not allow browsers to cache HTML
add_header Expires "Sun, 19 Nov 1978 05:00:00 GMT";
add_header Cache-Control "no-store, no-cache, must-revalidate,
post-check=0, pre-check=0";
# serve requested content from the cache if available, otherwise pass the
request to Apache
try_files /cache/normal/$host/${uri}_.html /cache/perm/$host/${uri}_.css
/cache/perm/$host/${uri}_.js /cache/$host/0$uri.html
/cache/$host/0${uri}/index.html @nocache;
}
location @nocache {
try_files $uri $uri/ /index.php?$args;
}
location ~* .(jpg|jpeg|png|gif|css|js|ico)$ {
expires max;
log_not_found off;
}
This will replace the original location location @php {} block:location @php {
try_files $uri =404;
include /etc/nginx/fastcgi_params;
fastcgi_pass unix:/var/lib/php5-fpm/web1.sock;
fastcgi_index index.php;
fastcgi_param SCRIPT_FILENAME $document_root$fastcgi_script_name;
fastcgi_param PATH_INFO $fastcgi_script_name;
fastcgi_intercept_errors on;
fastcgi_buffer_size 128k;
fastcgi_buffers 256 16k;
fastcgi_busy_buffers_size 256k;
fastcgi_temp_file_write_size 256k;
fastcgi_max_temp_file_size 0;
fastcgi_read_timeout 7200;
}This will merge the directives inside the location block into the original location block:
location @php { ##merge##
fastcgi_buffer_size 128k;
fastcgi_buffers 256 16k;
fastcgi_busy_buffers_size 256k;
fastcgi_temp_file_write_size 256k;
fastcgi_max_temp_file_size 0;
fastcgi_read_timeout 7200;
}
And this will remove the @php location block:
location @php { ##delete##
} - Proxy Directives (nginx only): If you are using a redirect of the type proxy to an external URL on the Redirect tab, this field offers you the opportunity to write additional proxy directives into the site's virtual host container manually, one directive per line (Directive Quick Reference). If you have defined Proxy Directive Snippets, you will find those snippets listed by their name to the right of the textarea. If you click on the name of a snippet, the contents of the snippet will be inserted at the current cursor position.
Examples:proxy_set_header Host $host;
proxy_redirect off;
proxy_set_header X-Real-IP $remote_addr;
proxy_set_header X-Forwarded-For $proxy_add_x_forwarded_for;
proxy_pass_header Authorization;
client_max_body_size 0;
client_body_buffer_size 1m;
proxy_intercept_errors on;
proxy_buffering on;
proxy_buffer_size 128k;
proxy_buffers 256 16k;
proxy_busy_buffers_size 256k;
proxy_temp_file_write_size 256k;
proxy_max_temp_file_size 0;
proxy_read_timeout 300;
2.1.2 Subdomain for website
This is where we can create new and edit/delete existing subdomains. With this feature, you can add subdomains to an existing web site so that the subdomain shows the same content as the web site's main domain. It is also possible to point the subdomain to a subdirectory of the web site - this is done using Apache rewrite rules. Please note that you should not use such a rewrite rule if you plan to install a CMS such as Wordpress, Joomla, Drupal, etc. in that subdirectory because most modern CMS systems also use rewrite rules that will most likely collide with the rewrite rules that redirect the subdomain to the subdirectory. If you want to install a CMS in a directory of its own and use a subdomain for that directory, you should create a whole new web site for that subdomain and install the CMS in that web site. But if you plan to place static HTML files in the subdirectory or other stuff that doesn't come with any rewrite rules, you can create a subdomain and redirect it to that subdirectory without any problem.
The difference between a subdomain and an aliasdomain is that the subdomain uses the same domain name as the main domain of the web site, whereas an aliasdomain uses a different domain name. For example, if the web site's main domain is example.com, and you want to point the hostname sub.example.com to the same web site, you'd use a subdomain, whereas if you have a totally different domain such as yourseconddomain.com that you want to point to the example.com web site, you'd use an aliasdomain.
To create a new subdomain, click the Add new subdomain button. This will lead you to the Subdomain for website form with the tab Subdomain for website.
Subdomain for website
Here you can create/edit the subdomain. The form has the following fields:
- Host: This is where you enter the hostname, i.e., the subdomain without the main domain name. For example, if you want to create the subdomain sub.example.com, you enter sub in
this field. - Domain: Here you select the main domain. If you want to create the subdomain sub.example.com, this would be example.com.
- Redirect Type: Here you can specify if you want to disable/enable a redirect, and if decide to use a redirect, which flag to use. (Redirects work exactly as shown for web sites in chapter 2.1.1 Website.)
Flags:- No flag: Don't use any flags.
- R (Apache only): Use of the [R] flag causes a HTTP redirect to be issued to the browser. If a fully-qualified URL is specified (that is, including http://servername/) then a redirect will be issued to that location. Otherwise, the current server name will be used to generate the URL sent with the redirect.
- L (Apache only): The [L] flag causes mod_rewrite to stop processing the rule set. In most contexts, this means that if the rule matches, no further rules will be processed.
- R,L (Apache only): You will almost always want to use [R] in conjunction with [L] (that is, use [R,L]) because on its own, the [R] flag prepends http://thishost[:thisport] to the URI, but then passes this on to the next rule in the ruleset, which can often result in 'Invalid URI in request' warnings.
- R=301,L (Apache only): You will almost always want to use [R] in conjunction with [L] (that is, use [R,L]) because on its own, the [R] flag prepends http://thishost[:thisport] to the URI, but then passes this on to the next rule in the ruleset, which can often result in 'Invalid URI in request' warnings. The option 301 makes this a permanent redirect.
- last (nginx only): Completes processing of rewrite directives, after which searches for corresponding URI and location.
- break (nginx only): Completes processing of rewrite directives and breaks location lookup cycle by not doing any location lookup and internal jump at all.
- redirect (nginx only): Returns temporary redirect with code 302; it is used if the substituting line begins with http://.
- permanent (nginx only): Returns permanent redirect with code 301.
- proxy (nginx only): This option (which does not refer to an official nginx rewrite flag) allows to proxy requests which allows to display contents from somewhere else without changing the web site URL. In this case only URLs are allowed in the Redirect Path field, not paths; the contents is fetched from that URL, and $request_uri is appended to that URL. If the proxy option is selected, a further tab called Options is added to the form, and it contains the field Proxy Directives (please refer to chapter 2.1.1 Website to learn how to use this field) where you can add custom nginx proxy directives (directives like, for example, proxy_set_header, proxy_redirect, proxy_buffer_size, etc.) - these will be added to the vhost configuration.
More details about flags can be found here:
- Redirect Path: This is the target, i.e., the path (full path or path relative to the document root) or URL where the redirect should point to.
- Don't add to Let's Encrypt certificate: This defines if the subdomain will be included to Let's Encrypt certificate.
- Active: This defines if the subdomain is active or not.
2.1.3 Subdomain (Vhost)
A Vhostsubdomain is a mixture of a normal web site (vhost) and a subdomain. Basically, it is a subdomain with its own vhost configuration and with a document root that is relative to the parent web site's directory path. Let's assume that the parent web site is called example.com and has the base directory /var/www/example.com and the document root /var/www/example.com/web. With a Vhostsubdomain, we can now create the subdomain sub.example.com that uses /var/www/example.com/somedir or /var/www/example.com/web/someotherdir or even the same directory as the parent web site (/var/www/example.com/web) as its document root, without any rewrite rules. You can install CMS software in the Vhostsubdomain's document root and don't have to adjust the CMS system's rewrite rules relative to the parent web site's document root, and you can even create an SSL certificate just for the Vhostsubdomain. Of course, processes like PHP run with the permissions of the parent web site to make sure no permission problems arise.
To use this feature, it has to be activated under System > Main Config (see chapter 4.9.3.1 Main Config).
Because a Vhostsubdomain is in fact a real vhost, the form to create a Vhostsubdomain is very similar to the one for creating a web site (see chapter 2.1.1 Website). There are just a few differences:
The Server, Client, IPv4-Address, and IPv6-Address fields are missing because they are defined by the parent web site. Instead, we have a Hostname field and a Domain field that is a drop-down menu instead of a text field. We also have a Web folder field:
- Hostname: Fill in the subdomain relative to the parent web site. For example, if you want to create the subdomain sub.example.com, just fill in sub here.
- Domain: Select the parent web site here, e.g. example.com.
- Web folder: Fill in the Vhostsubdomain's document root relative to the parent web site's base path. Let's assume the parent web site's base path is /var/www/example.com. If you fill in test or /test or /test/ (all these are equivalent), the Vhostsubdomain's document root is /var/www/example.com/test. To use the same document root as the parent web site, fill in web or /web or /web/. To use a subdirectory of the parent web site's document root, (e.g. blog), use web/blog (or /web/blog or /web/blog/). This field must not be empty, and the value / is not allowed.
2.1.4 Aliasdomain for website
This is where we can create new and edit/delete existing aliasdomains. With this feature, you can add aliasdomains to an existing web site so that the aliasdomain shows the same content as the web site's main domain. It is also possible to point the aliasdomain to a subdirectory of the web site - this is done using Apache rewrite rules. Please note that you should not use such a rewrite rule if you plan to install a CMS such as Wordpress, Joomla, Drupal, etc. in that subdirectory because most modern CMS systems also use rewrite rules that will most likely collide with the rewrite rules that redirect the aliasdomain to the subdirectory. If you want to install a CMS in a directory of its own and use an aliasdomain for that directory, you should create a whole new web site for that aliasdomain and install the CMS in that web site. But if you plan to place static HTML files in the subdirectory or other stuff that doesn't come with any rewrite rules, you can create an aliasdomain and redirect it to that subdirectory without any problem.
The difference between a subdomain and an aliasdomain is that the subdomain uses the same domain name as the main domain of the web site, whereas an aliasdomain uses a different domain name. For example, if the web site's main domain is example.com, and you want to point the hostname sub.example.com to the same web site, you'd use a subdomain, whereas if you have a totally different domain such as yourseconddomain.com that you want to point to the example.com web site, you'd use an aliasdomain.
To create a new aliasdomain, click the Add new aliasdomain button. This will lead you to the Web Aliasdomain form with the tab Aliasdomain for website.
Web Aliasdomain
Aliasdomain for website
Here you can create/edit the aliasdomain. The form has the following fields:
- Domain: This is where you enter the aliasdomain, e.g. yourseconddomain.com. It is also possible to specify a subdomain, e.g. sub.yourseconddomain.com.
- Parent Website: Here you select the parent web site, i.e.. the web site that the aliasdomain should point to.
- Redirect Type: Here you can specify if you want to disable/enable a redirect, and if decide to use a redirect, which flag to use. (Redirects work exactly as shown for web sites in chapter 2.1.1 Website.)
Flags:- R (Apache only): Use of the [R] flag causes a HTTP redirect to be issued to the browser. If a fully-qualified URL is specified (that is, including http://servername/) then a redirect will be issued to that location. Otherwise, the current server name will be used to generate the URL sent with the redirect.
- L (Apache only): The [L] flag causes mod_rewrite to stop processing the rule set. In most contexts, this means that if the rule matches, no further rules will be processed.
- R,L (Apache only): You will almost always want to use [R] in conjunction with [L] (that is, use [R,L]) because on its own, the [R] flag prepends http://thishost[:thisport] to the URI, but then passes this on to the next rule in the ruleset, which can often result in 'Invalid URI in request' warnings.
- R=301,L (Apache only): You will almost always want to use [R] in conjunction with [L] (that is, use [R,L]) because on its own, the [R] flag prepends http://thishost[:thisport] to the URI, but then passes this on to the next rule in the ruleset, which can often result in 'Invalid URI in request' warnings. The option 301 makes this a permanent redirect.
- last (nginx only): Completes processing of rewrite directives, after which searches for corresponding URI and location.
- break (nginx only): Completes processing of rewrite directives and breaks location lookup cycle by not doing any location lookup and internal jump at all.
- redirect (nginx only): Returns temporary redirect with code 302; it is used if the substituting line begins with http://.
- permanent (nginx only): Returns permanent redirect with code 301.
- proxy (nginx only): This option (which does not refer to an official nginx rewrite flag) allows to proxy requests which allows to display contents from somewhere else without changing the web site URL. In this case only URLs are allowed in the Redirect Path field, not paths; the contents is fetched from that URL, and $request_uri is appended to that URL. If the proxy option is selected, a further tab called Options is added to the form, and it contains the field Proxy Directives (please refer to chapter 4.6.1.1 Website to learn how to use this field) where you can add custom nginx proxy directives (directives like, for example, proxy_set_header, proxy_redirect, proxy_buffer_size, etc.) - these will be added to the vhost configuration.
More details about flags can be found here:
- Redirect Path: This is the target, i.e., the path (full path or path relative to the document root) or URL where the redirect should point to.
- Auto-Subdomain: Here you can define whether you want no automatic subdomain for the aliasdomain (in this case you can access the site only by using the domain, e.g. http://yourseconddomain.com), an automatic www subdomain (you can then access the site using http://yourseconddomain.com and http://www.yourseconddomain.com), or a wildcard subdomain (*.) which means you can access the site with any subdomain that does not point to another web site.
- SEO Redirect: Here you can do search-engine optimization for your website and configure a redirect to avoid duplicate content. You can redirect your non-www website to your www website (e.g. visitors to example.com will be redirected permanently to www.example.com) or vice versa (www.example.com to example.com).
These are the options:
- No Redirect: Don't use any SEO redirect.
- domain.tld => www.domain.tld: Redirect requests for example.com to www.example.com.
- www.domain.tld => domain.tld: Redirect requests for www.example.com to example.com.
- *.domain.tld => domain.tld: Redirect all subdomains of example.com (including www.example.com) to example.com.
- *.domain.tld => www.domain.tld: Redirect all subdomains (including example.com itself) to www.example.com.
- * => domain.tld: Redirect everything that is not example.com to example.com (this includes subdomains and also alias domains).
- * => www.domain.tld: Redirect everything that is not www.example.com to www.example.com (this includes example.com, subdomains and also alias domains).
Please note that SEO redirects for the parent web site take precedence over SEO redirects for alias domains if they are conflicting. For example, if you have defined the redirect * => www.domain.tld for the parent web site, your selection in the SEO Redirect field for the alias domain is ignored.
- Don't add to Let's Encrypt certificate: This defines if the alias domain will be included to Let's Encrypt certificate.
- Active: This defines if the aliasdomain is active or not.
2.2 Database
2.2.1 Databases
This is where you can create databases for your web sites. Currently, only MySQL (or MariaDB) databases are supported.
Databases and database users are now split into two separate forms because this allows you to use one database user for multiple databases, a feature requested by many users.
To create a new database, click on the Add new Database button. This will lead you to the Database form with the tab Database.
Database
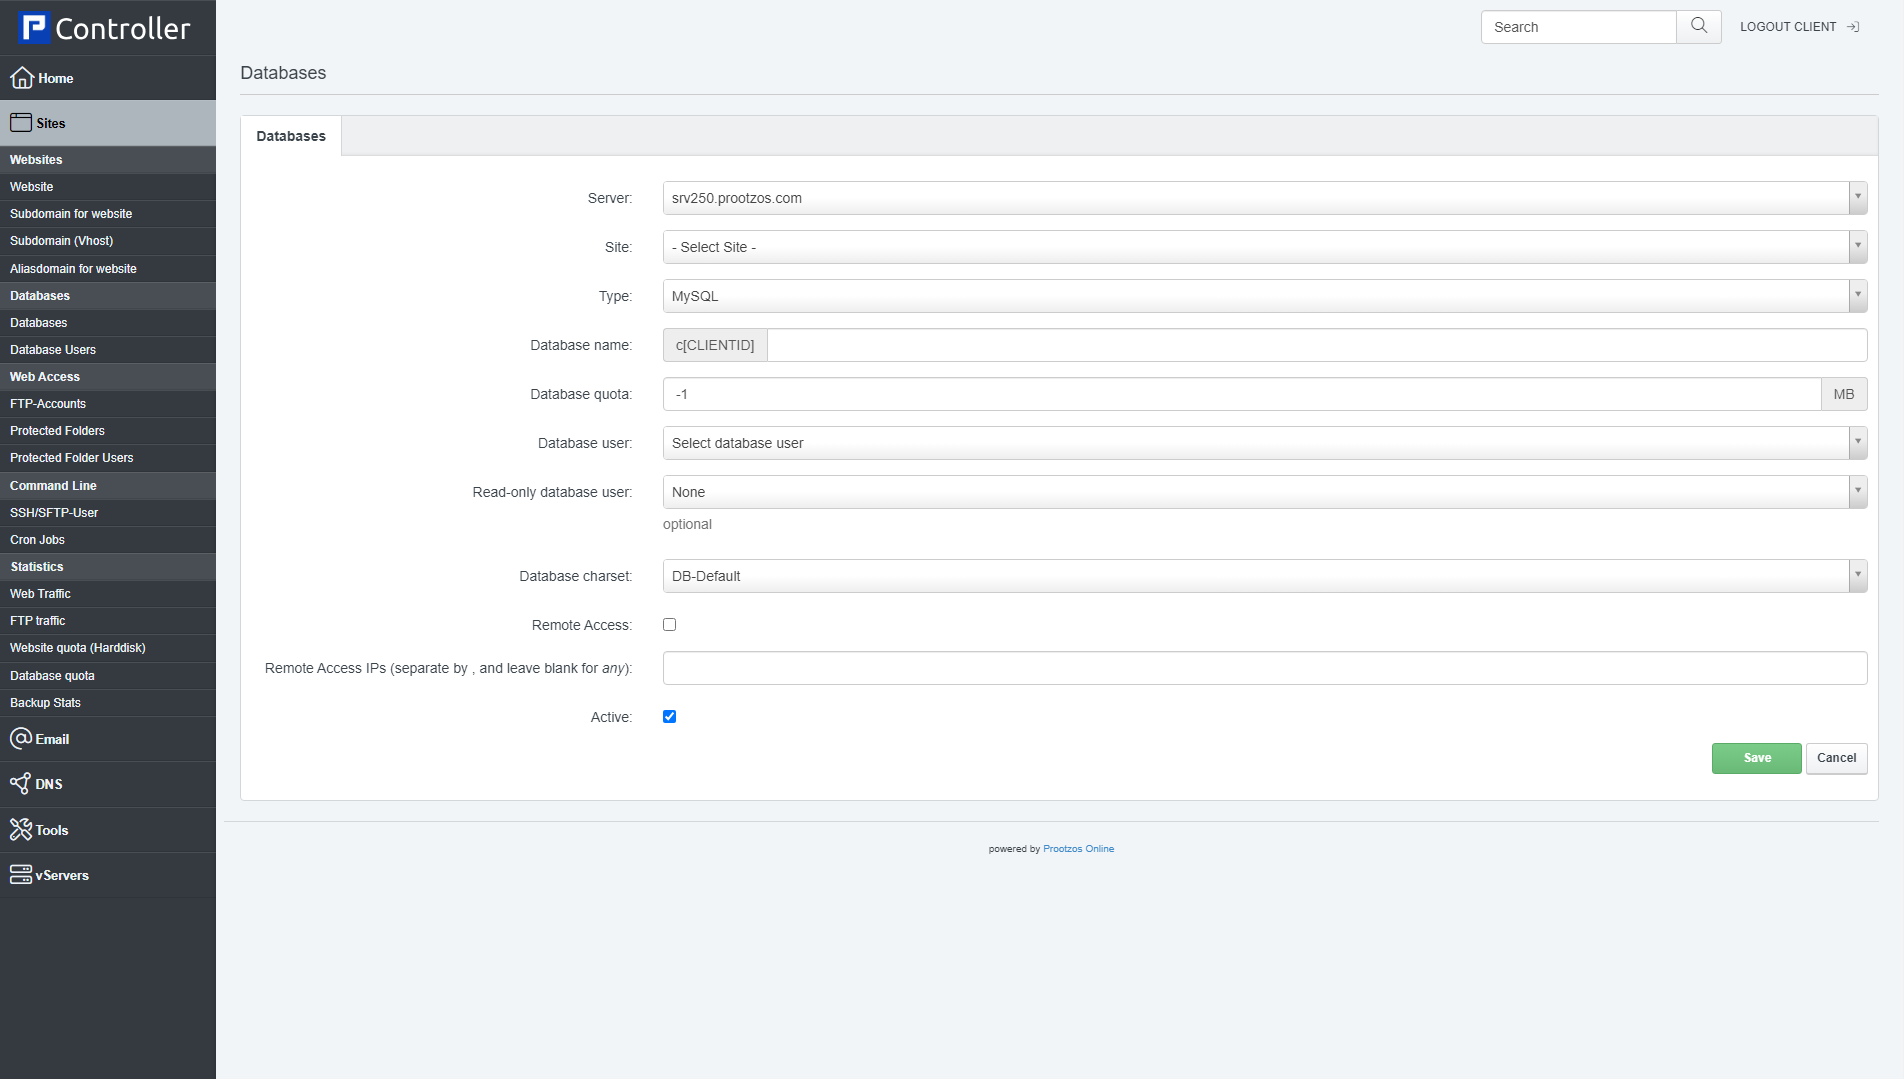
The form to create/modify a database has the following fields:
- Server: If more than one server is available, you can select the server on which the database will be created.
- Site: Select the web site to which this database will belong.
- Type: Select the database type. Currently only MySQL (MariaDB) is supported.
- Database name: This is the name of the database. The string in square brackets before the database name will be replaced appropriately, for example [CLIENTID] will be replaced with the ID of the client, i.e., 1, 2, 3, etc. So if the current client is client1, and you type in wordpress in the Database name field, the actual database name will be c1wordpress. Please note that database names must not be
longer than 16 characters - MySQL doesn't support longer database names! - Database quota: Enter the max. database size in MB here. The value -1 means unlimited. The quota is a virtual quota which triggers a overquota notification as MySQL has no support for real "hard" quota.
- Database user: Select the name of the database user. Database users have to be created under Sites > Database Users (see chapter 2.2.2 Database Users) first before you can select them here.
- Read-only database user (optional): In this field you can select another database user that has read-only permissions on the database.
- Database charset: Select the character set of the database. MySQL includes character set support that enables you to store data using a variety of character sets and perform comparisons according to a variety of collations. You can learn more about MySQL's character set support here.
- Remote Access: This specifies if the MySQL should allow only local access to the database, or if connections from remote places should be allowed as well (which can be a security risk because intruders don't need access to the local system to connect to the database; all they need is the database username and password).
- Remote Access IPs: If you've enable remote access and want to allow just a few remote hosts to connect to this database, you can enter the IPs of the remote hosts here. Multiple IPs must be seperated with a comma (,). To allow connections from all remote hosts, leave this field empty.
- Active: This defines if this database is active or not.
2.2.2 Database Users
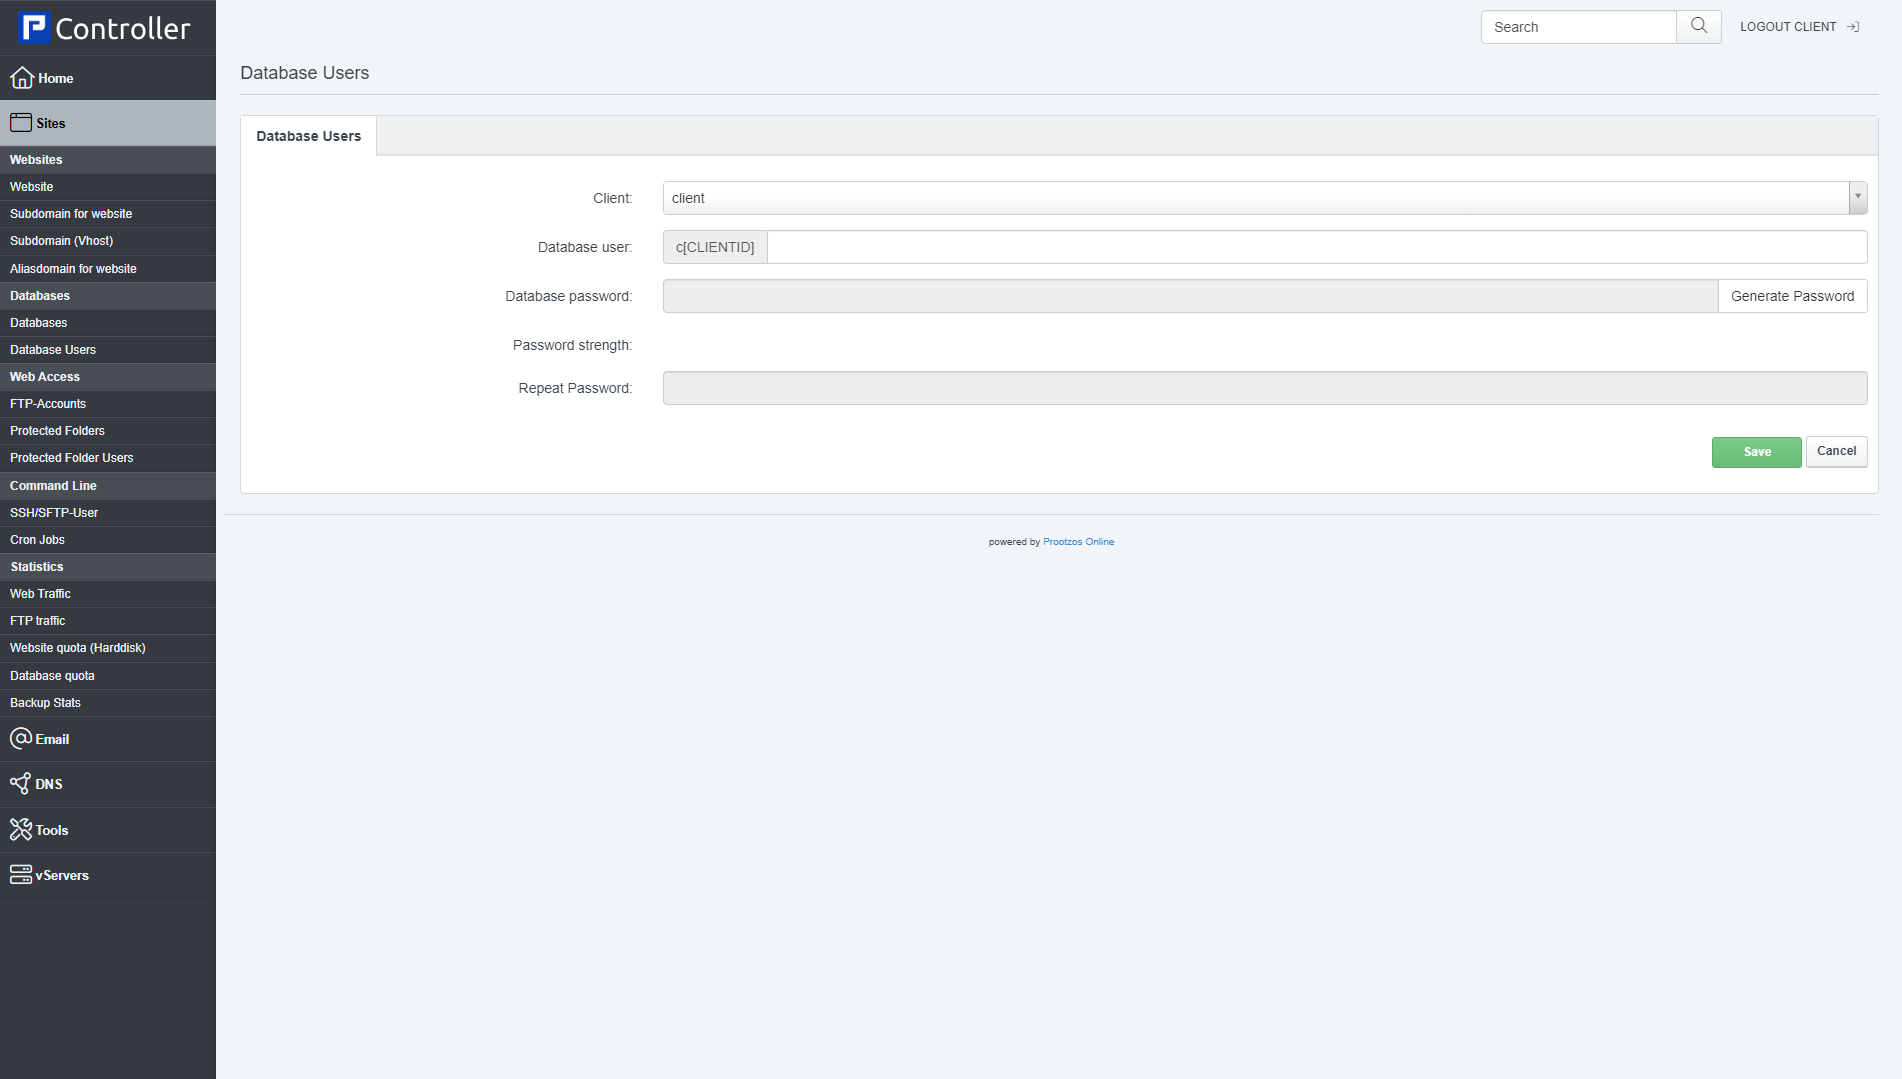
This is where you create database users. As mentioned before, creating database users independently of the database allows you to use a database user for multiple databases if you wish to do so.
- Client (Available only for resellers): Here you select the client to which the database user belongs.
- Database user: This is the name of the database user. The string in square brackets before the database username will be replaced appropriately, for example [CLIENTID] will be replaced with the ID of the client, i.e., 1, 2, 3, etc. So if the current client is client1, and you type in johndoe in the Database user field, the actual database username will be c1johndoe. Please do not use underscores (_)in the username.
- Database password: Type in a password for the database user (or use the Generate Password link to have Controller generate one for you). The Password strength field will show how weak or strong your password is. A strong password should include numbers, symbols, upper and lowercase letters; password length should be 8 characters or more; avoid any password based on repetition, dictionary words, letter or number sequences, usernames, relative or pet names, or biographical information.
- Repeat Password: Confirm your password.
2.3 Web access
2.3.1 FTP-Accounts
This is where we create new FTP users or modify/delete existing FTP users. FTP users can upload/download/delete files for a website with an FTP client such as FileZilla.
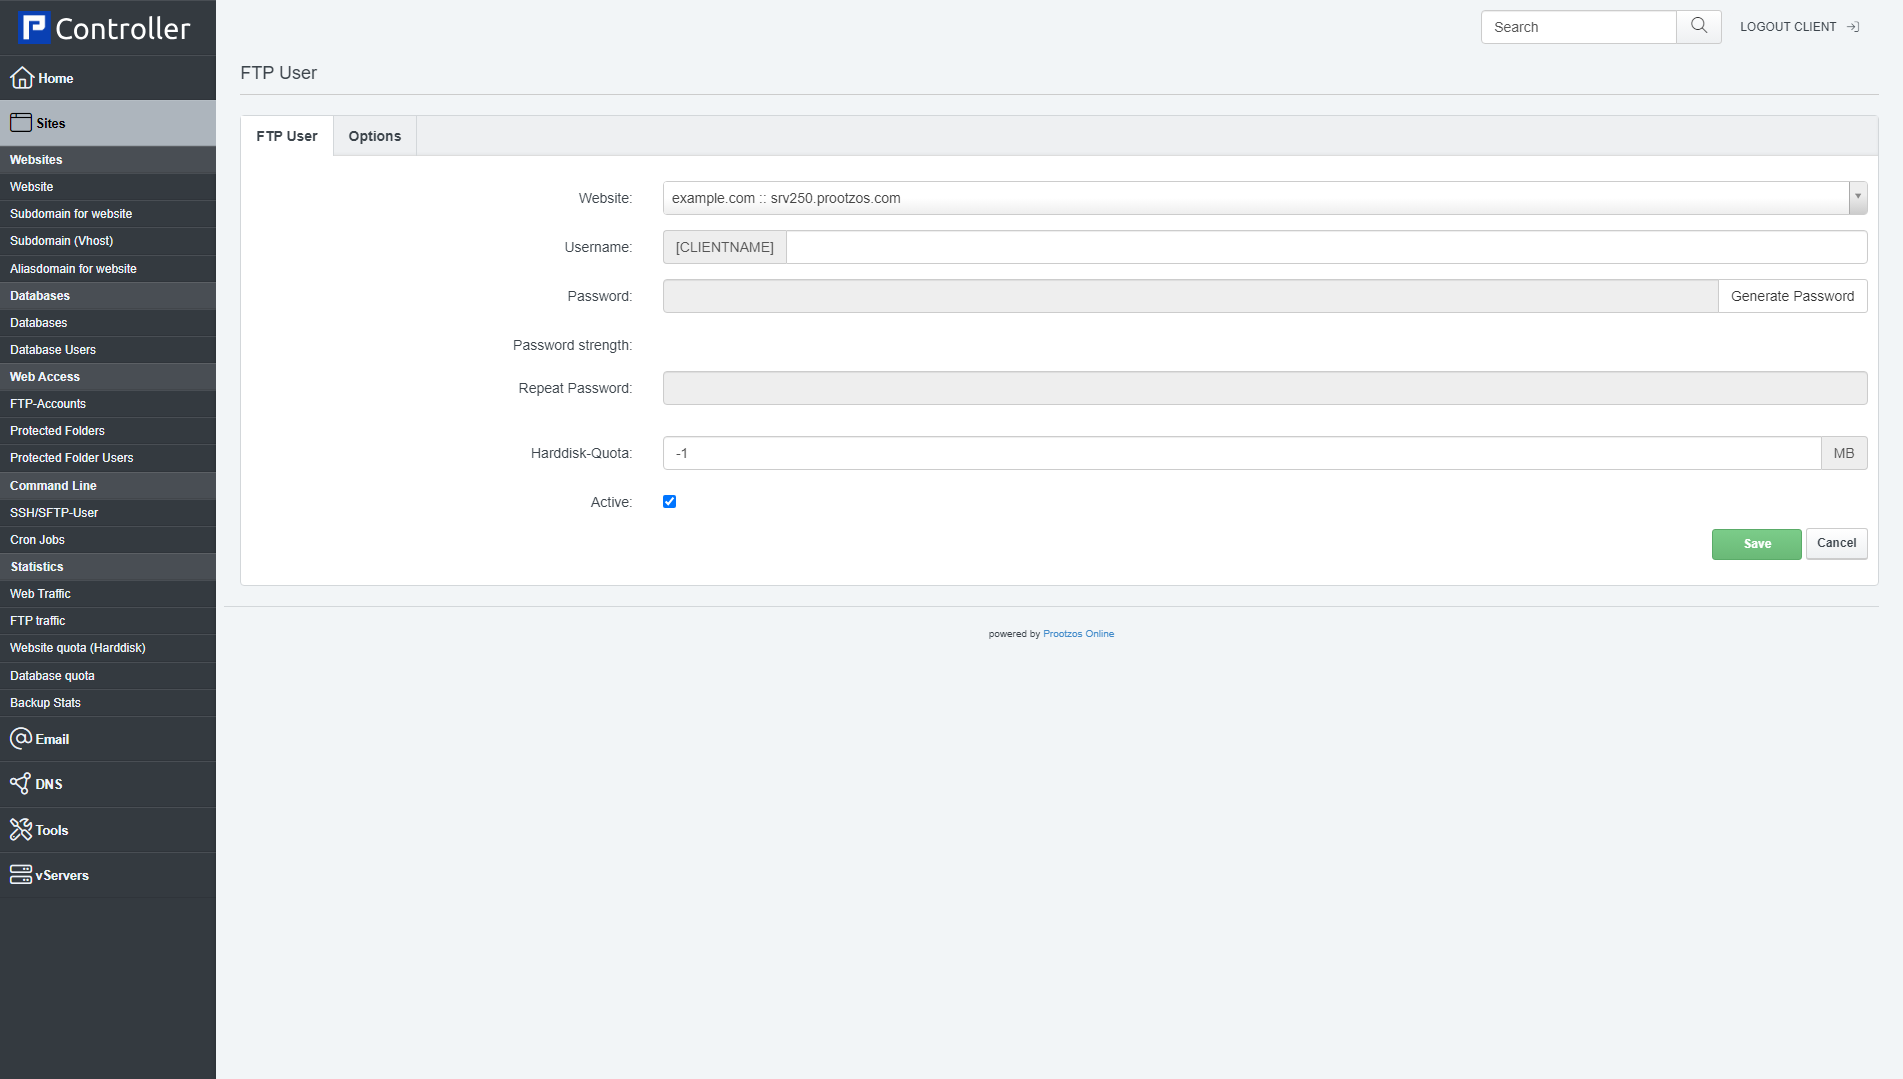
To create a new FTP user, click the Add new FTP-User button. This will lead you to the FTP User form with the tabs FTP User and Options.
FTP User
The form to create/modify an FTP user has the following fields:
- Website: This is the web site for which you define the FTP user.
- Username: This is the username of the FTP user. The string in square brackets before the username will be replaced appropriately, for example [CLIENT] will be replaced with client1, client2, etc. So if the current client is client1, and you type in johndoe in the Username field, the actual FTP username will be client1johndoe.
- Password: Type in a password for the FTP user (or use the Generate Password link to have Controller generate one for you). The Password strength field will show how weak or strong your password is. A strong password should include numbers, symbols, upper and lowercase letters; password length should be 8 characters or more; avoid any password based on repetition, dictionary words, letter or number sequences, usernames, relative or pet names, or biographical information.
- Repeat Password: Confirm your password.
- Harddisk-Quota: This is the max. amount of disk space (in MB) that is available for the FTP user. You can leave this at -1 (unlimited) as an FTP user can not upload more data than defined in the quota setting of the website.
- Active: This defines if this FTP user account is active or not.
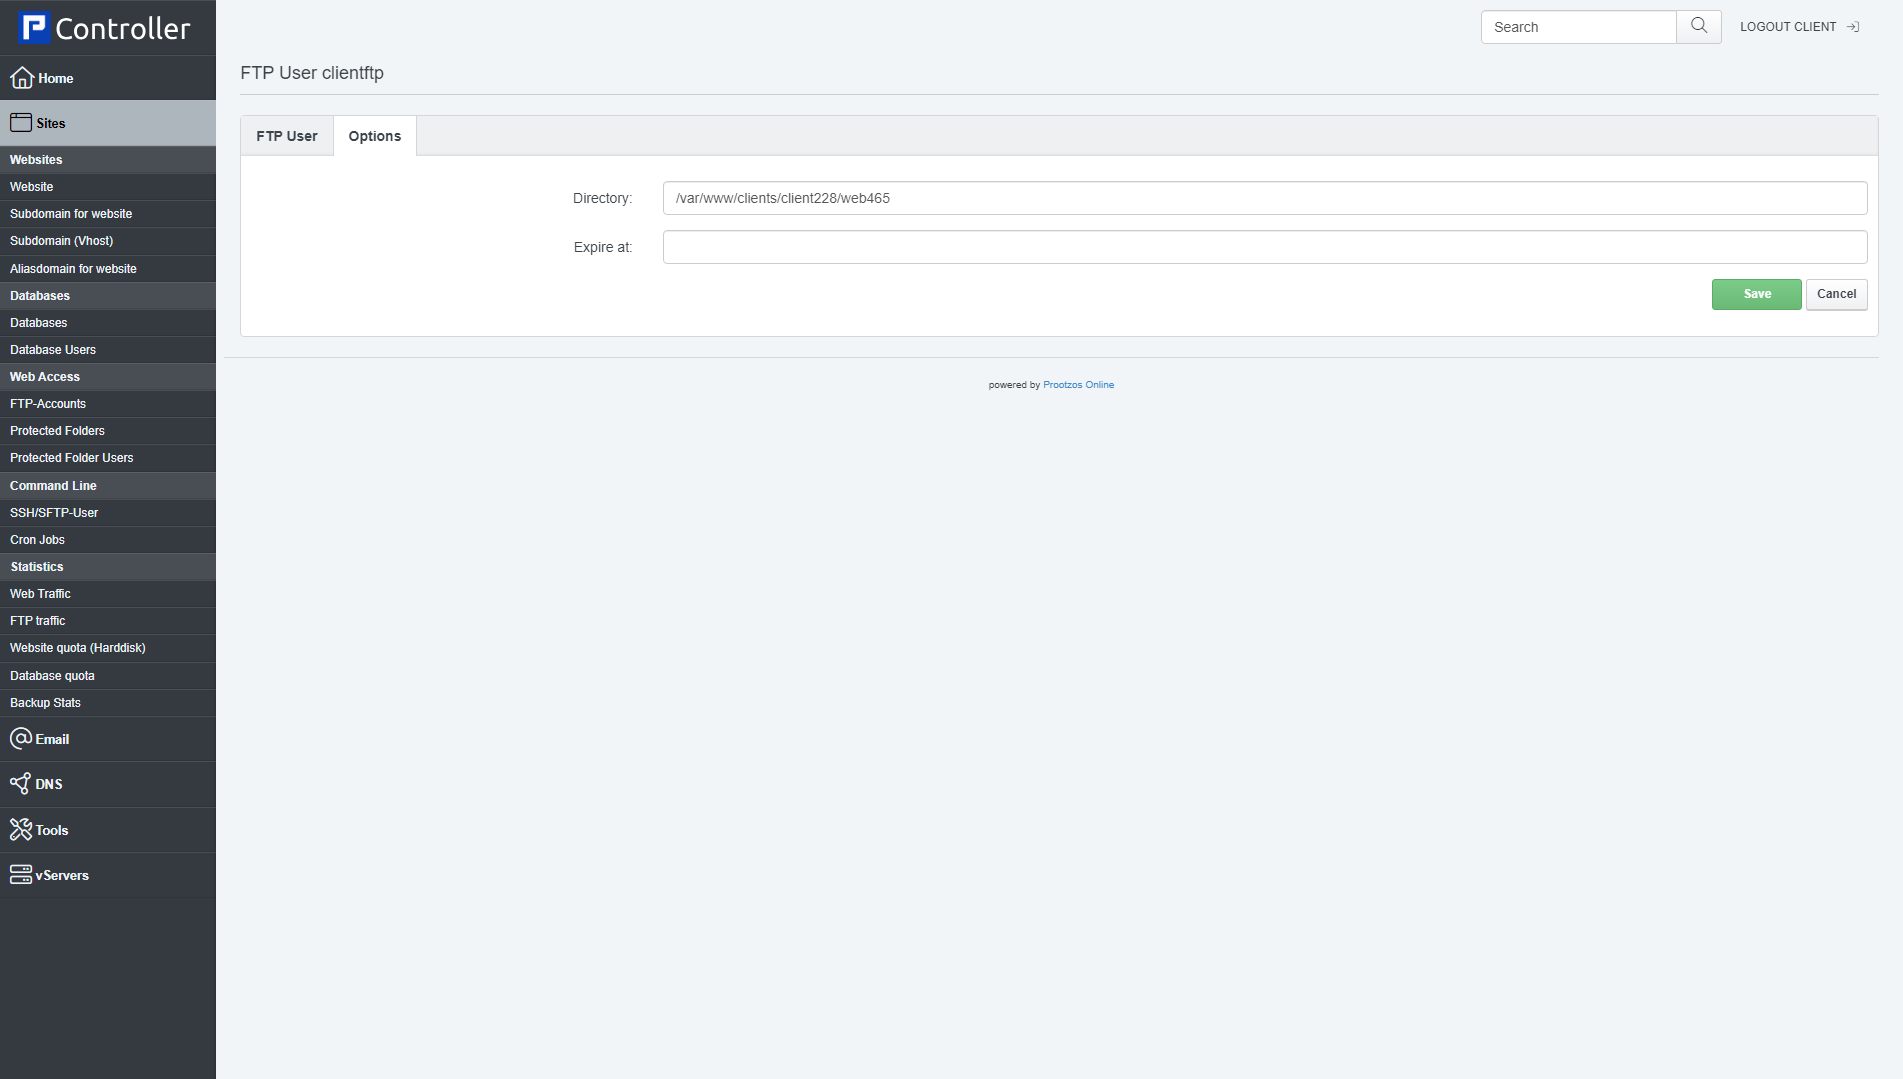
Options
On the Options tab you can fine-tune the FTP account. The form has the following fields:
- Directory: This is the home directory of the FTP user, i.e., the FTP user can do uploads and downloads in this directory and all subdirectories thereof.
- Expire at: Use this field to automatically disable the FTP account at a given date.
2.3.2 Protected Folders
This is where we can password-protect directories inside websites (basic http authentication with .htaccess/.htpasswd).
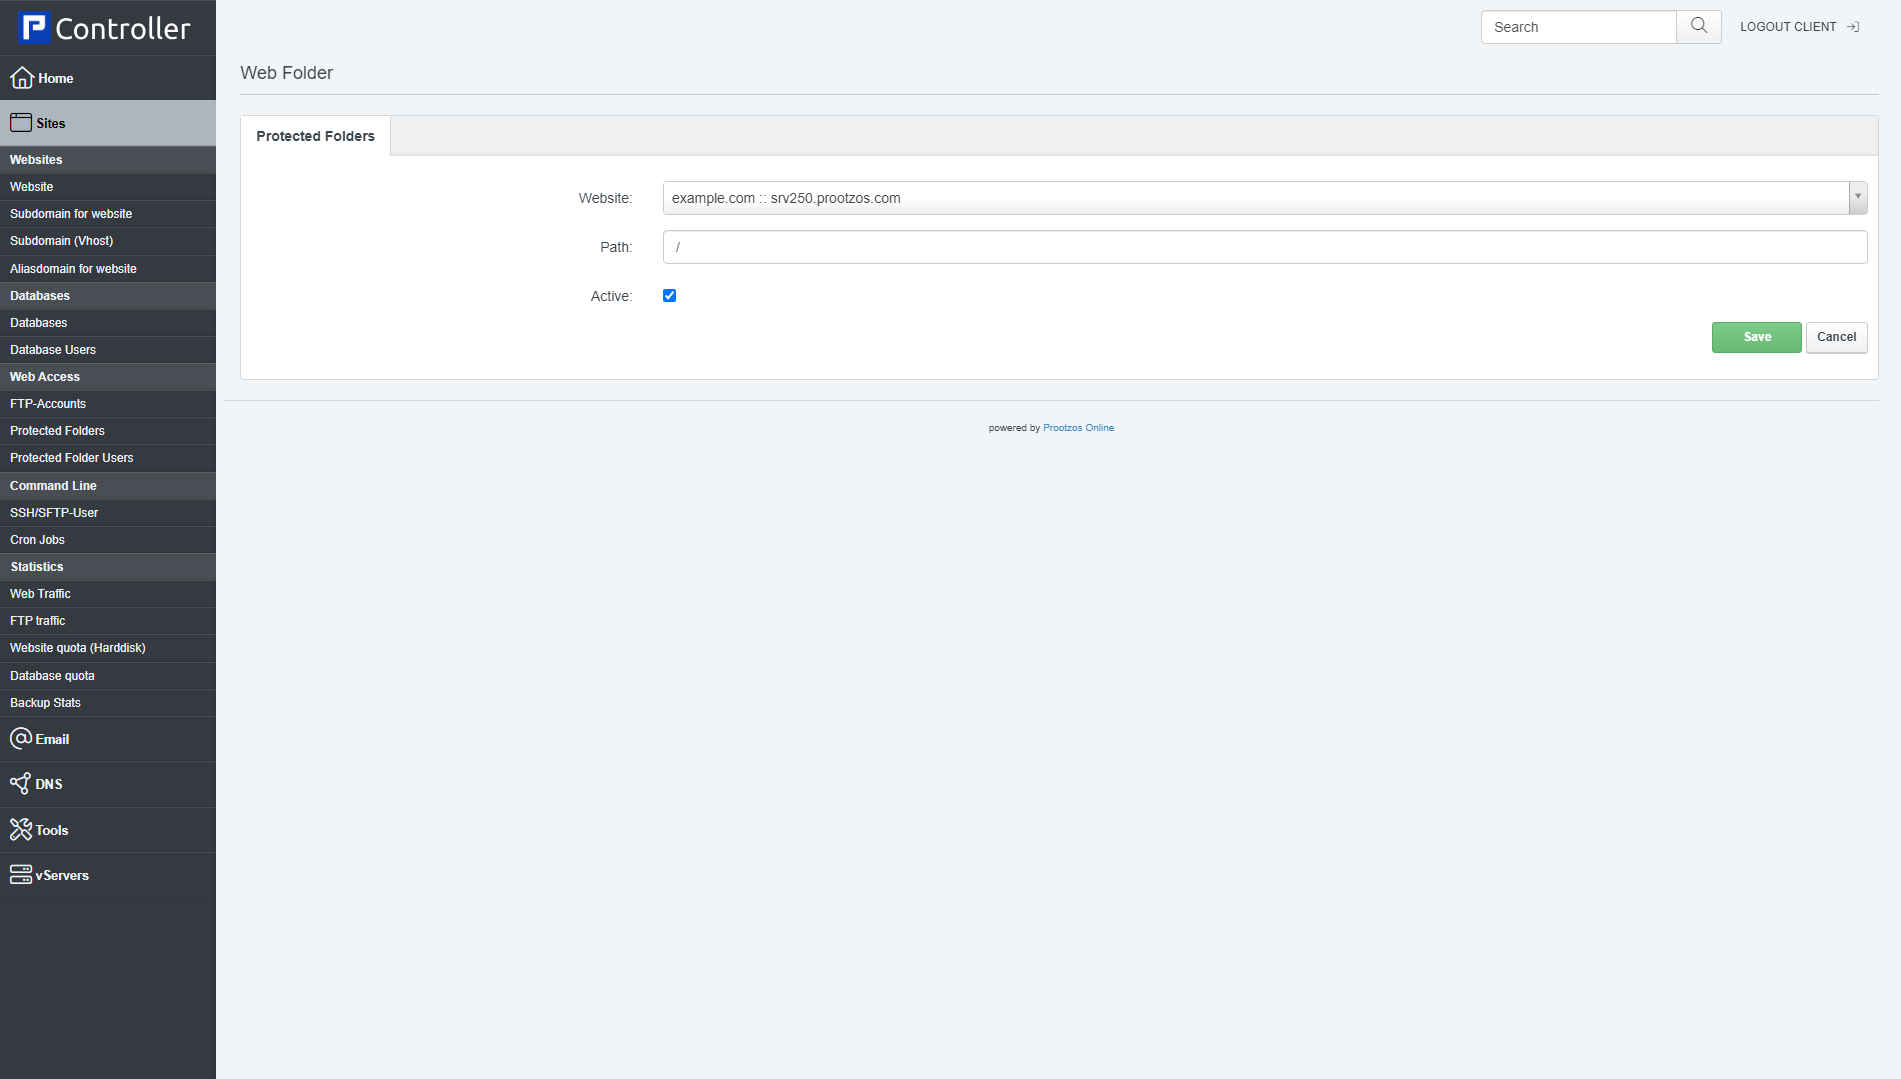
To password-protect a website folder, click the Add new Folder button. This will lead you to the Web Folder form with the tab Protected Folders.
Web Folder - Protected Folders
In this form we select a website for which we want password protection, and then we specify the directory inside this website that will be password-protected.
The form has the following fields:
- Website: Select the website in which you want to password-protect a folder.
- Path: Specify the folder relative to the website's document root that you want to password-protect, e.g. /files if you want to protect the directory files in the website's document root, or /files/secret to password-protect the directory files/secret. You can also password-protect the whole website by specifying /. If the specified directory does not exist, it will be created by Controller.
- Active: Defines whether this folder protection is active or not.
2.3.3 Protected Folder Users
Here we specify the users that are allowed to log into a password-protected wbesite directory.
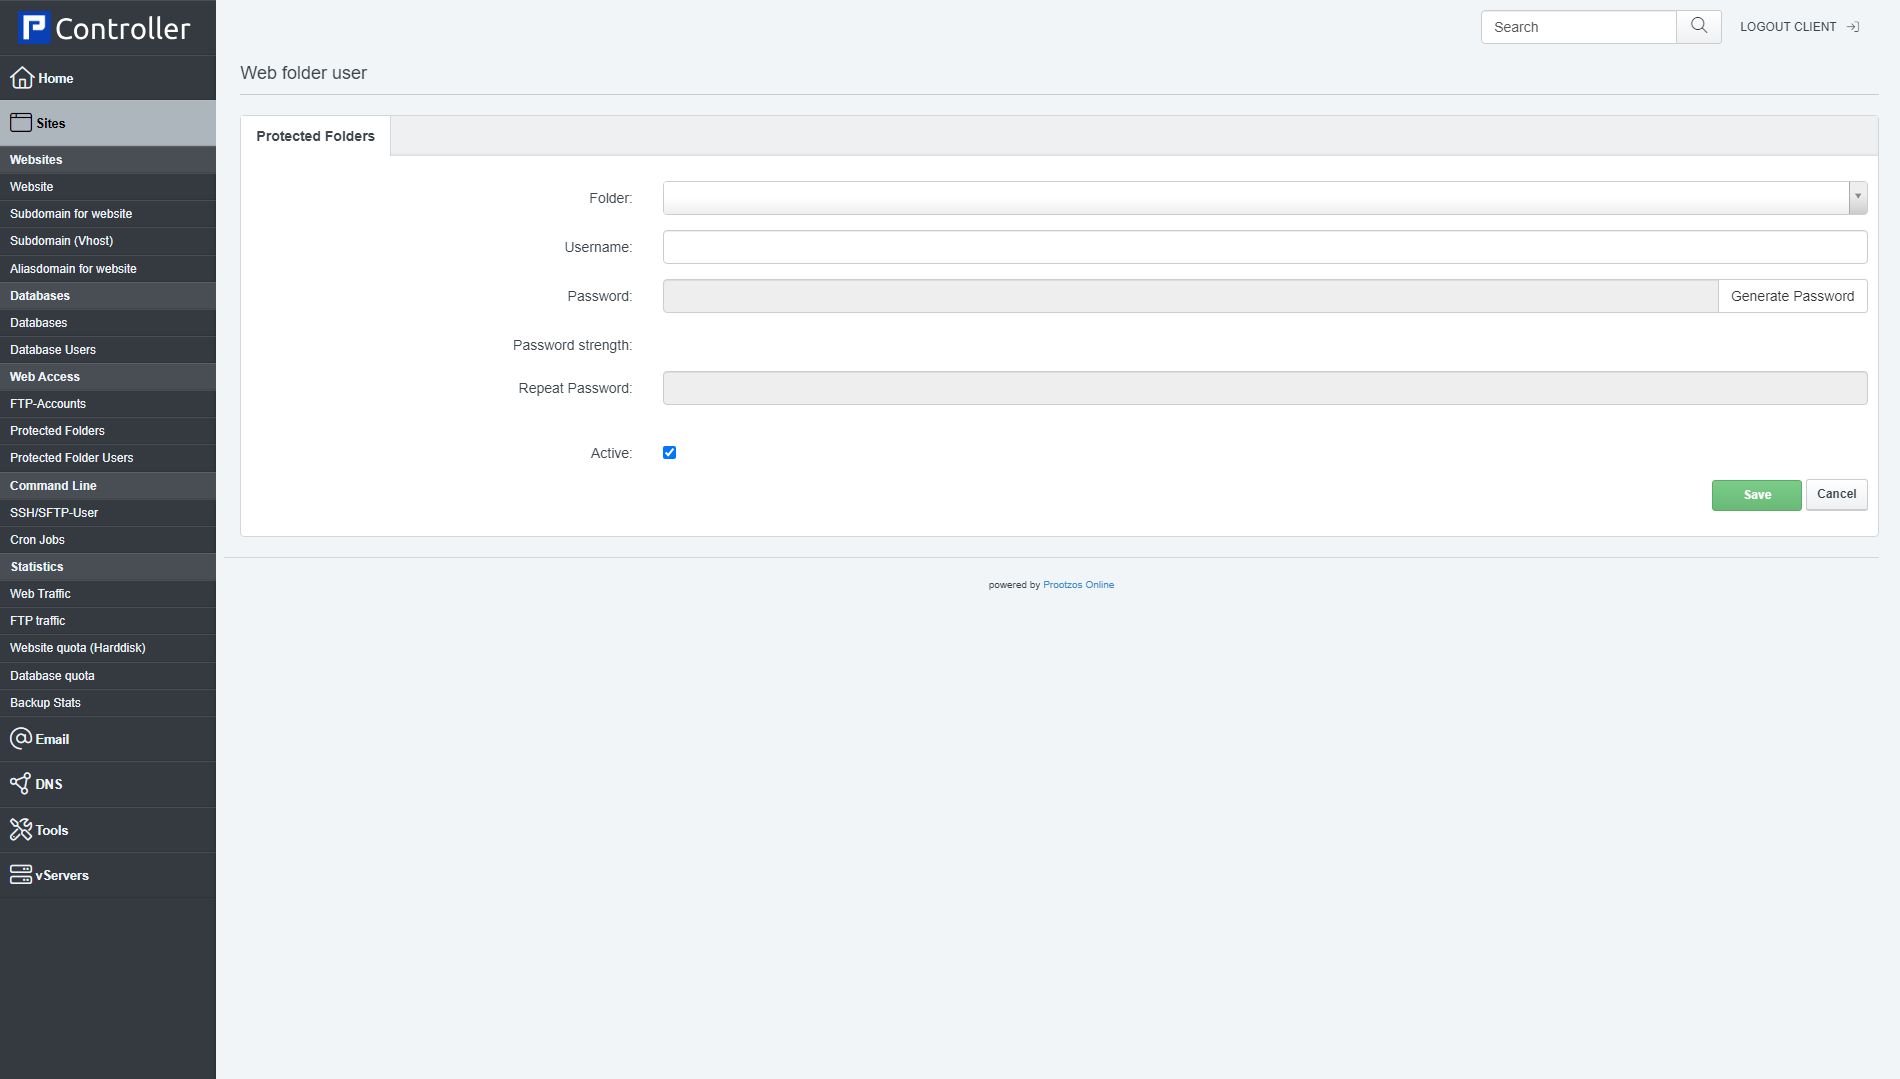
To create a new user, click the Add new Folder User button. This will lead you to the Web folder user form with the tab Protected Folders.
Web folder user - Protected Folders
Here you can create/edit a user. The form has the following fields:
- Folder: In this drop-down menu you can select the folder for which you want to create the user. This drop-down menu contains all active folder that were previously created under Folder (see chapter 2.3.2 Protected Folders).
- Username: Specify the username.
- Password: Specify the user's password (or use the Generate Password link to have Controller generate one for you).
- Repeat Password: Confirm your password.
- Active: This defines if the user is active or not.
2.4 Command Line
2.4.1 SSH/SFTP User
This is where we create new shell users (i.e., system users) or modify/delete existing shell users. Shell users can log into the system via SSH (e.g. by using an SSH client such as PuTTY) and do secure uploads/downloads by using an SCP client (such as WinSCP).
To create a new shell user, click the Add new Shell-User button. This will lead you to the Shell User form with the tab Shell User.
Shell User
The form to create/modify a shell user has the following fields:
- Site: This is the web site for which you define the shell user.
- Username: This is the username of the shell user. The string in square brackets before the username will be replaced appropriately, for example [CLIENT] will be replaced with client1, client2, etc. So if the current client is client1, and you type in johndoe in the Username field, the actual shell username will be client1johndoe.
- Password: Type in a password for the shell user (or use the Generate Password link to have Controller generate one for you). The Password strength field will show how weak or strong your password is. A strong password should include numbers, symbols, upper and lowercase letters; password length should be 8 characters or more; avoid any password based on repetition, dictionary words, letter or number sequences, usernames, relative or pet names, or biographical information.
- Repeat Password: Confirm your password.
- Chroot Shell: This defines if this shell user is chrooted or not. If you select None, the shell user can browse the whole file system and is limited only by file/directory permissions - this can be a security risk. If you select to chroot the shell user (by selecting Jailkit from the drop-down menu), the shell user will be limited to his home directory and can only browse directories inside his home directory.
- Quota: This is the max. amount of disk space (in MB) that is available for the shell user.
- SSH-RSA Public Key (for key-based logins): This field allows you to put in one or more public SSH-RSA keys. With such a key you can log into the system without having to provide a password. You can find out more about key-based SSH logins in this tutorial: SSH key-based authentication with PuTTY.
. - Active: This defines if this shell user account is active or not.
2.4.2 Cron Jobs
A cron job is a scheduled task that is executed by the system at a specified time/date.
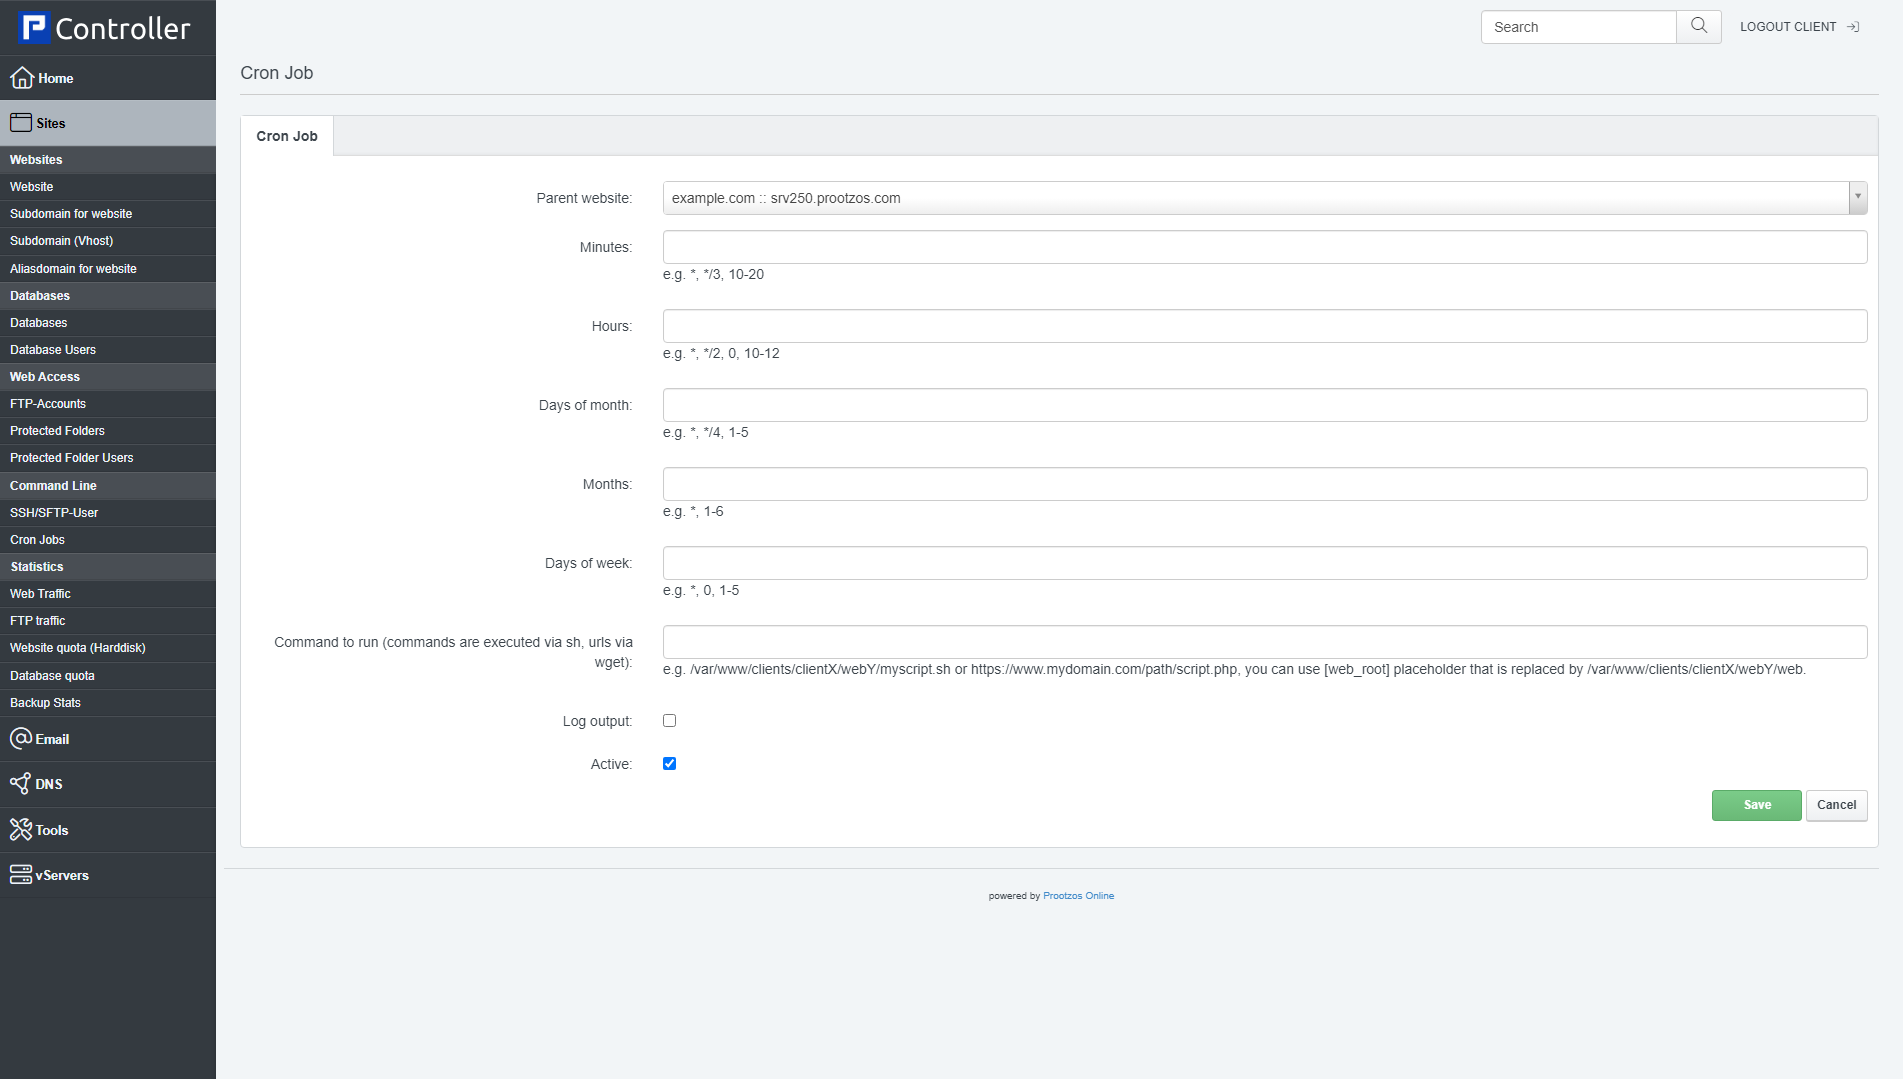
To create a new cron job, click on the Add new Cron job button. This will lead you to the Cron Job form with the tab Cron Job.
Cron Job
The form to create/modify a cron job has the following fields:
- Parent website: This is the web site for which you define the cron job.
- Minutes: The minute to run the cron job. Allowed values: 0-59. * means every minute.
- Hours: The hour to run the cron job. Allowed values: 0-23. * means every hour.
- Days of month: The day of the month to run the cron job. Allowed values: 1-31. * means every day of the month.
- Months: The month to run the cron job. Allowed values: 1-12 (or names, see below). * means every month.
- Days of week: The day of the week to run the cron job. Allowed values: 0-7 (0 or 7 is Sun , or use names). * means every day of the week.
- Command to run: This is the command to execute. Shell scripts will be run by /bin/sh, URLs will be executed by wget.
- Log output: This option logs the output of the cron job into a cron log file that is placed into the /private folder of the website.
- Active: This defines if the cron job is active or not.
When specifying day of week, both day 0 and day 7 will be considered Sunday.
A field may be an asterisk (*), which always stands for first-last.
Names can also be used for the "month" and "day of week" fields. Use the first three letters of the particular day or month (case doesn't matter), e.g. sun or SUN for Sunday or mar/MAR for March.
Let's take a look at two sample cron jobs:
* * * /usr/local/controller/server/server.sh > /dev/null 2>> /var/log/controller/cron.log
This means: execute /usr/local/controller/server/server.sh > /dev/null 2>> /var/log/controller/cron.log once per minute.
30 00 * * * /usr/local/controller/server/cron_daily.sh > /dev/null 2>> /var/log/controller/cron.log
This means: execute /usr/local/controller/server/cron_daily.sh > /dev/null 2>> /var/log/controller/cron.log once per day at 00:30h.
The day of a command's execution can be specified by two fields: day of month, and day of week. If both fields are restricted (i.e., aren't *), the command will be run when either field matches the current time. For example, 30 4 1,15 * 5 would cause a command to be run at 4:30h on the 1st and 15th of each month, plus every Friday.
You can use ranges to define cron jobs:
Examples:
1,2,5,9 - means every first, second, fifth, and ninth (minute, hour, month, ...).
0-4,8-12 - means all (minutes, hours, months,...) from 0 to 4 and from 8 to 12.
*/5 - means every fifth (minute, hour, month, ...).
1-9/2 is the same as 1,3,5,7,9.
Ranges or lists of names are not allowed (if you are using names instead of numbers for months and days - e.g., Mon-Wed is not valid).
1,7,25,47 */2 * * * command means: run command every second hour in the first, seventh, 25th, and 47th minute.
Instead of the first five fields, one of eight special strings may appear:
string meaning
------ -------
@reboot Run once, at startup.
@yearly Run once a year, "0 0 1 1 *".
@annually (same as @yearly)
@monthly Run once a month, "0 0 1 * *".
@weekly Run once a week, "0 0 * * 0".
@daily Run once a day, "0 0 * * *".
@midnight (same as @daily)
@hourly Run once an hour, "0 * * * *".
You can learn more about cron jobs here: A Short Introduction To Cron Jobs.
2.5 Statistics
The Statistics section is a bit special in that there's nothing that you can configure here. This section just displays statistics for your web sites.
2.5.1 Web Traffic
Under Web traffic you can see traffic statistics (in MB) for your web sites for the current month, the month before, the current year, and the year before.
These statistics are realtime (updated once per minute).
2.5.2 FTP Traffic
Under FTP traffic you can see FTPtraffic statistics (in MB) for your web sites for the current month, the month before, the current year, and the year before.
These statistics are not realtime (updated once per day).
2.5.3 Website quota (Harddisk)
Under Website quota (Harddisk) you can see the hard disk usage (Used Space, in MB) for your web sites, as well as the current quota soft limits and hard limits.
Soft limit indicates the maximum amount of disk usage a quota user has on a partition. When combined with "grace period", it acts as the border line, which a quota user is issued warnings about his impending quota violation when passed. Hard limit works only when "grace period" is set. It specifies the absolute limit on the disk usage, which a quota user can't go beyond his "hard limit".
These statistics are near realtime (updated every five minutes).
2.5.4 Database quota
Under Database quota you can see the hard disk usage (Used Space, in MB) for your MySQL databases for the current month, the month before, the current year, and the year before.
These statistics are near realtime (updated every five minutes).
2.5.5 Backup Stats
Under Backup stats you can see the interval when web site backups are taken, the number of available backup's and the size of these backups.
The backups are taken in the early morning hours, so the backup stats change only once a day.
